Swedish Heart Table Runner
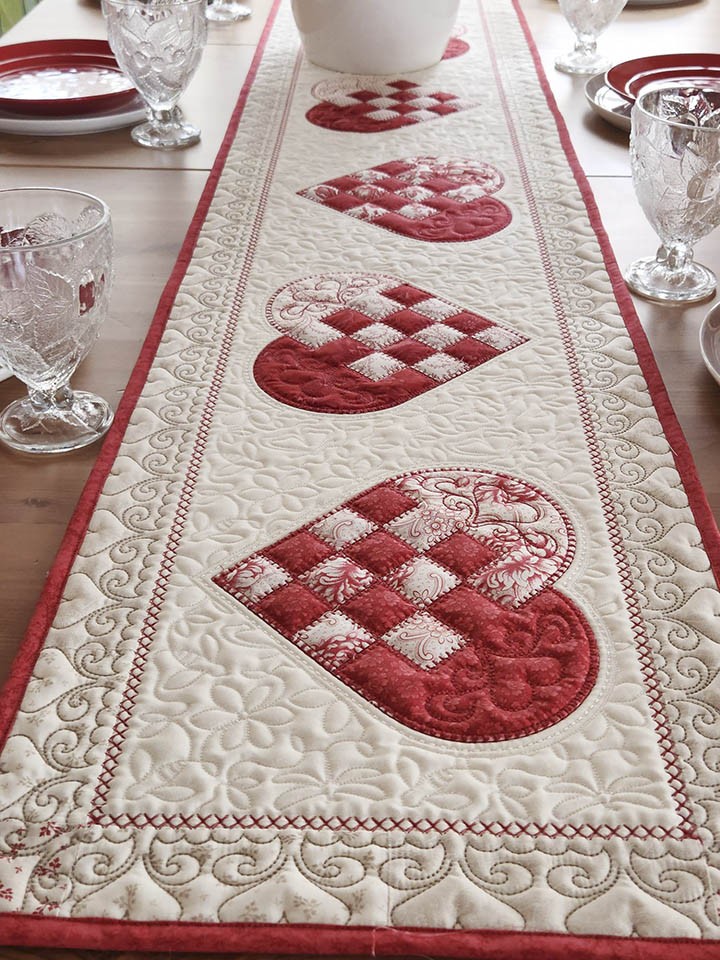

Just in time for Valentine’s!
Enjoy our free tutorial and AutoPilot Mach 3 and Grand Format Embroidery patterns to create this Swedish Heart Table Runner. In this tutorial we will be using a Wingtip Elegance quilt kit from INNOVA-Works. With this kit you’ll be able to create 2 – 85” x 15” table runners with binding. There is enough fabric to create a third without binding. Pieced together leftovers can be used to bind the third table runner.
Lets get started!
Supplies you’ll needed:
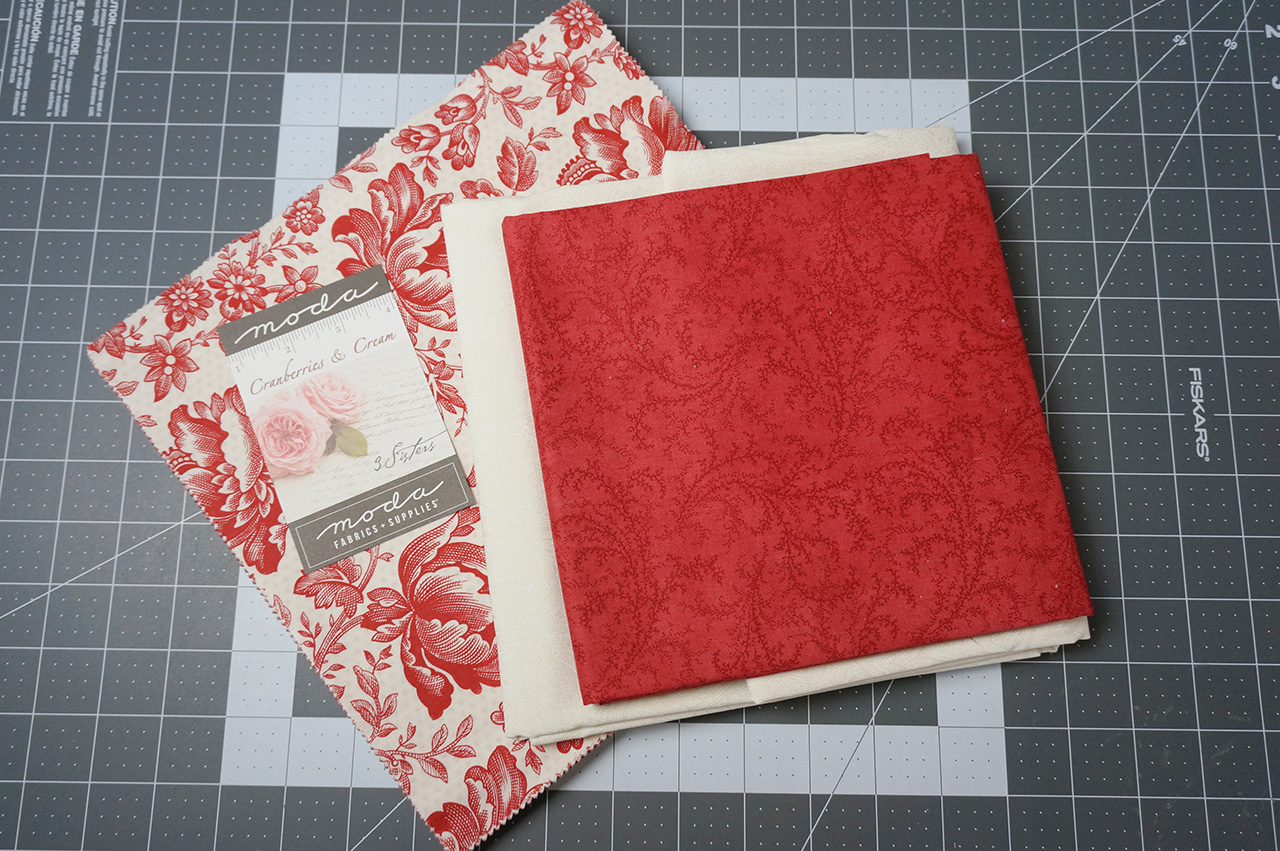
• Wingtip Elegance Quilt kit (We're using Cranberries & Cream by 3 Sisters)
OR
1 – Layer cake (40 – 10” squares)
2-yards coordinating light fabric
3/4 -yard coordinating dark fabric
• 20” x 90” - 80/20 batting
• 20” x 90” - wool batting (optional)
• WOF x 90”-100” - Coordinating backing fabric
• AutoPilot Mach 3 Pattern file
• AutoPilot Mach 3 Border Pattern File
• AutoPilot Mach 3 Border Corner Pattern File
• AutoPilot Mach 3 Heart Pattern File
Download all files here.
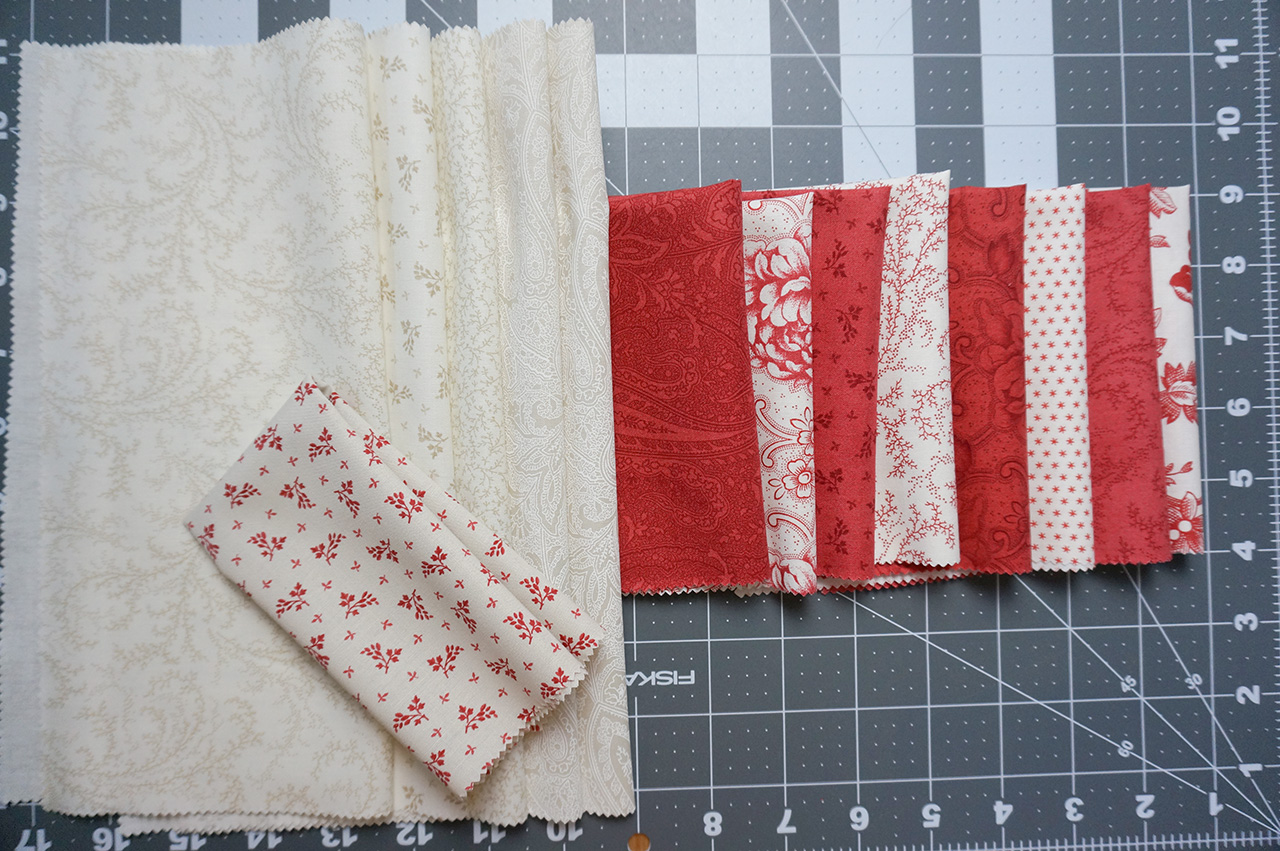
Organize your fabrics
For each runner, choose from the layer cake:
• 4 – Light layers for the hearts
• 4 – Dark layers for the hearts
• 5 – Medium or light layers for the border
• 1 – Medium or Dark layer for the border corner stones (After cutting your corner stones, you will have enough left over to use for the other two runners corner stones.)
Here are the combinations we chose for our three runners from the Cranberries and Cream layer cake kit:
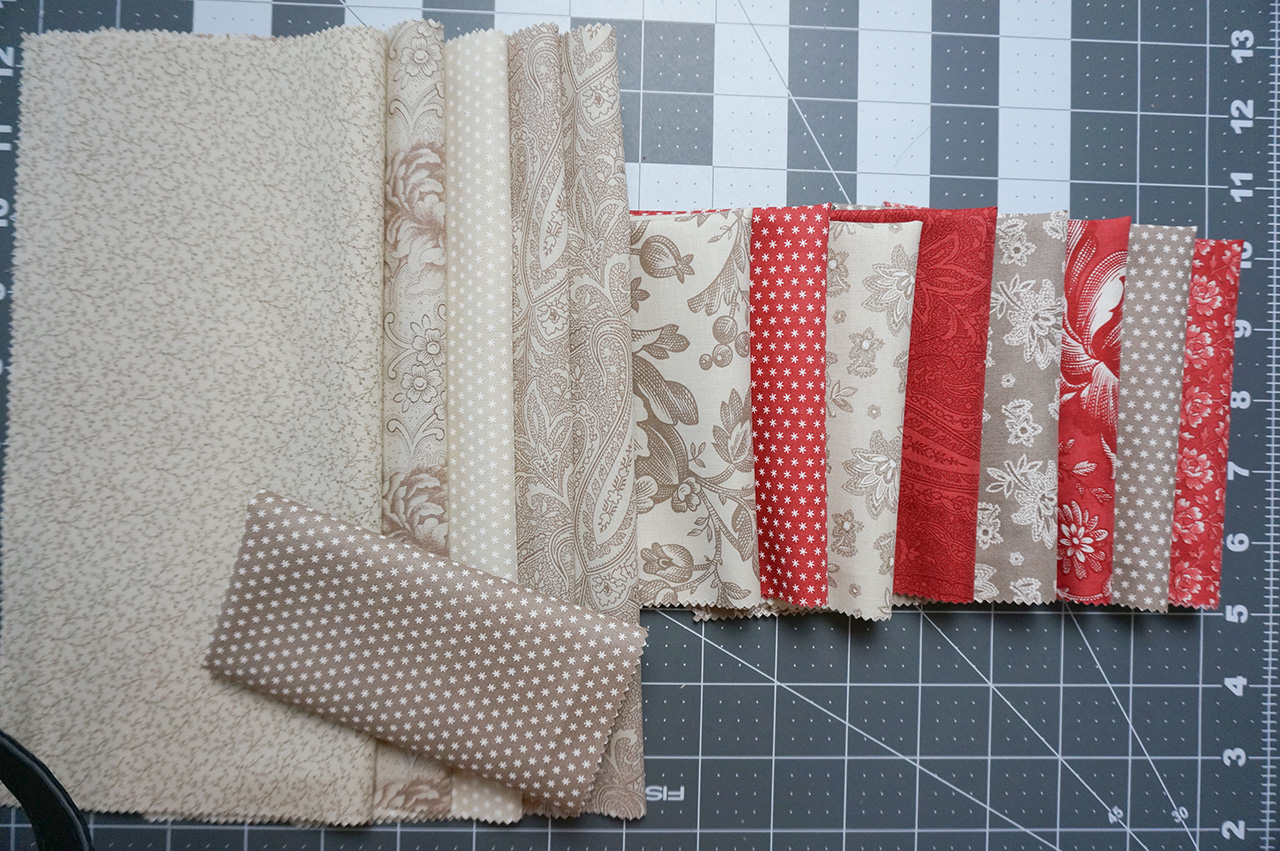
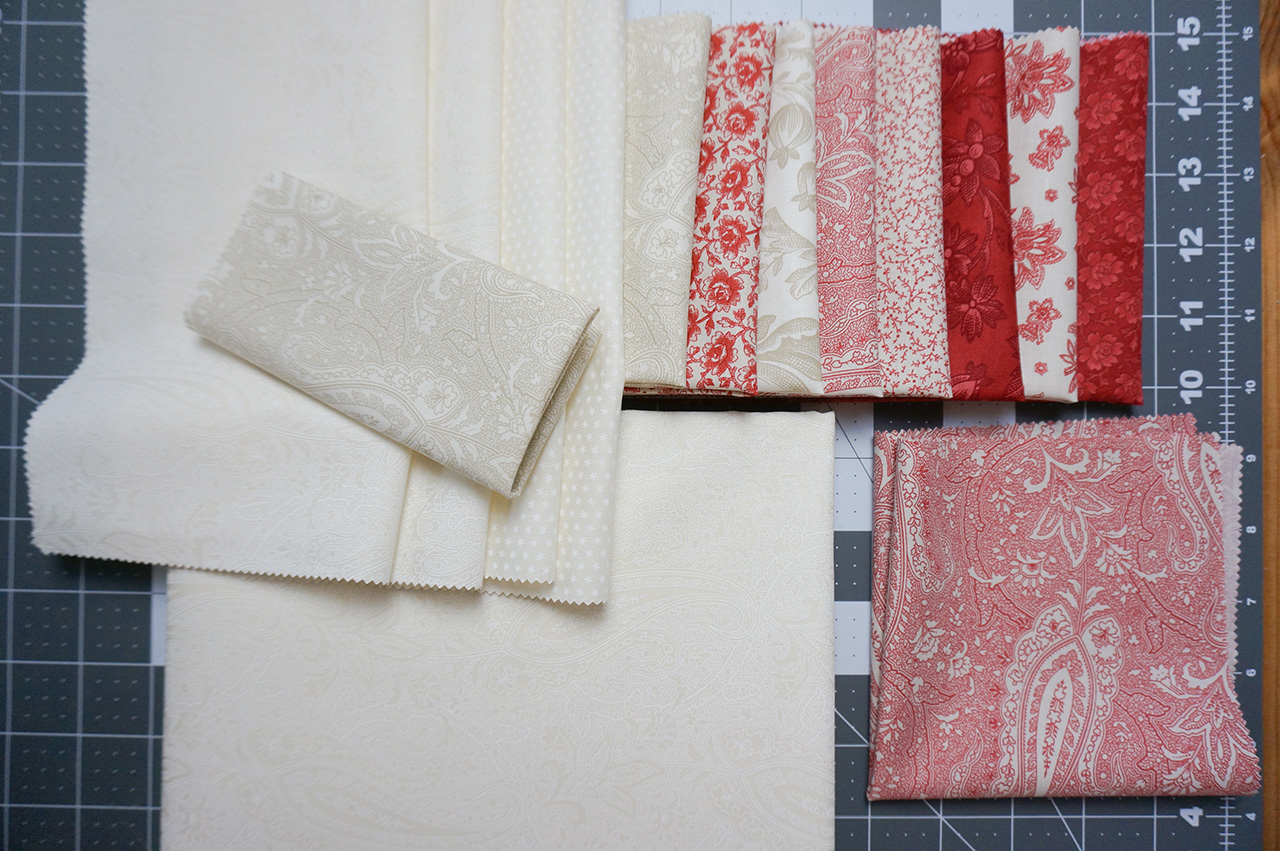
For the third runner we used some leftover light yardage as a part of the borders, making this runner have very light borders.
After all your fabrics are organized you will have one layer left over.
Cutting and prep
From the light yardage cut:
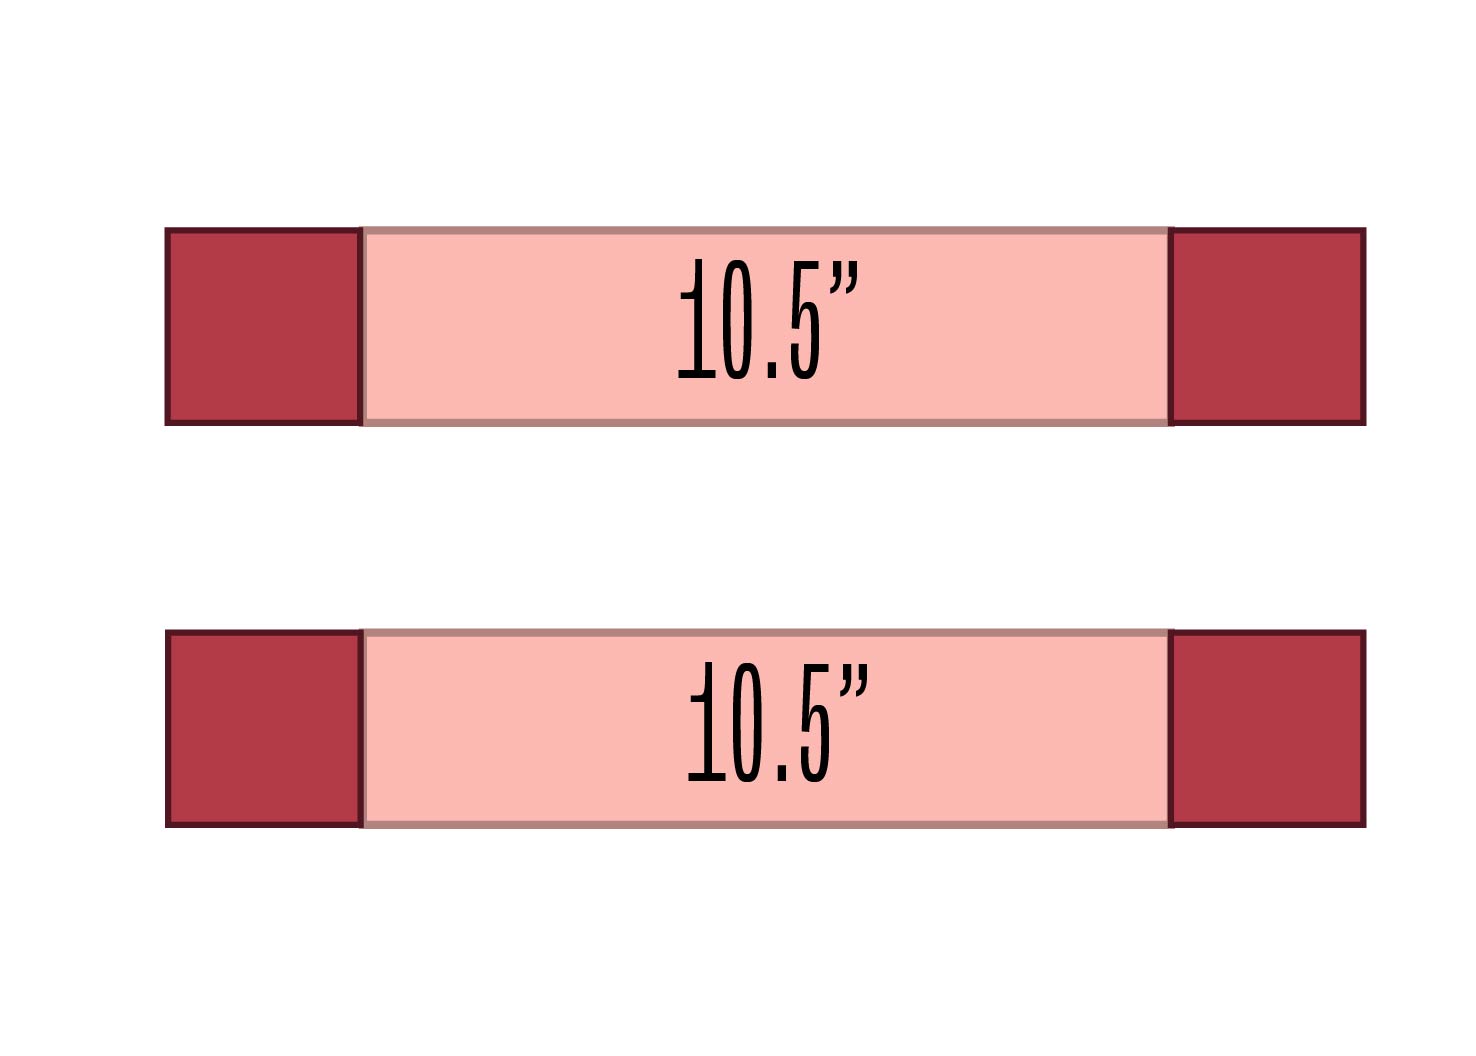
2 – 10.5” x Width of Fabric (WOF)
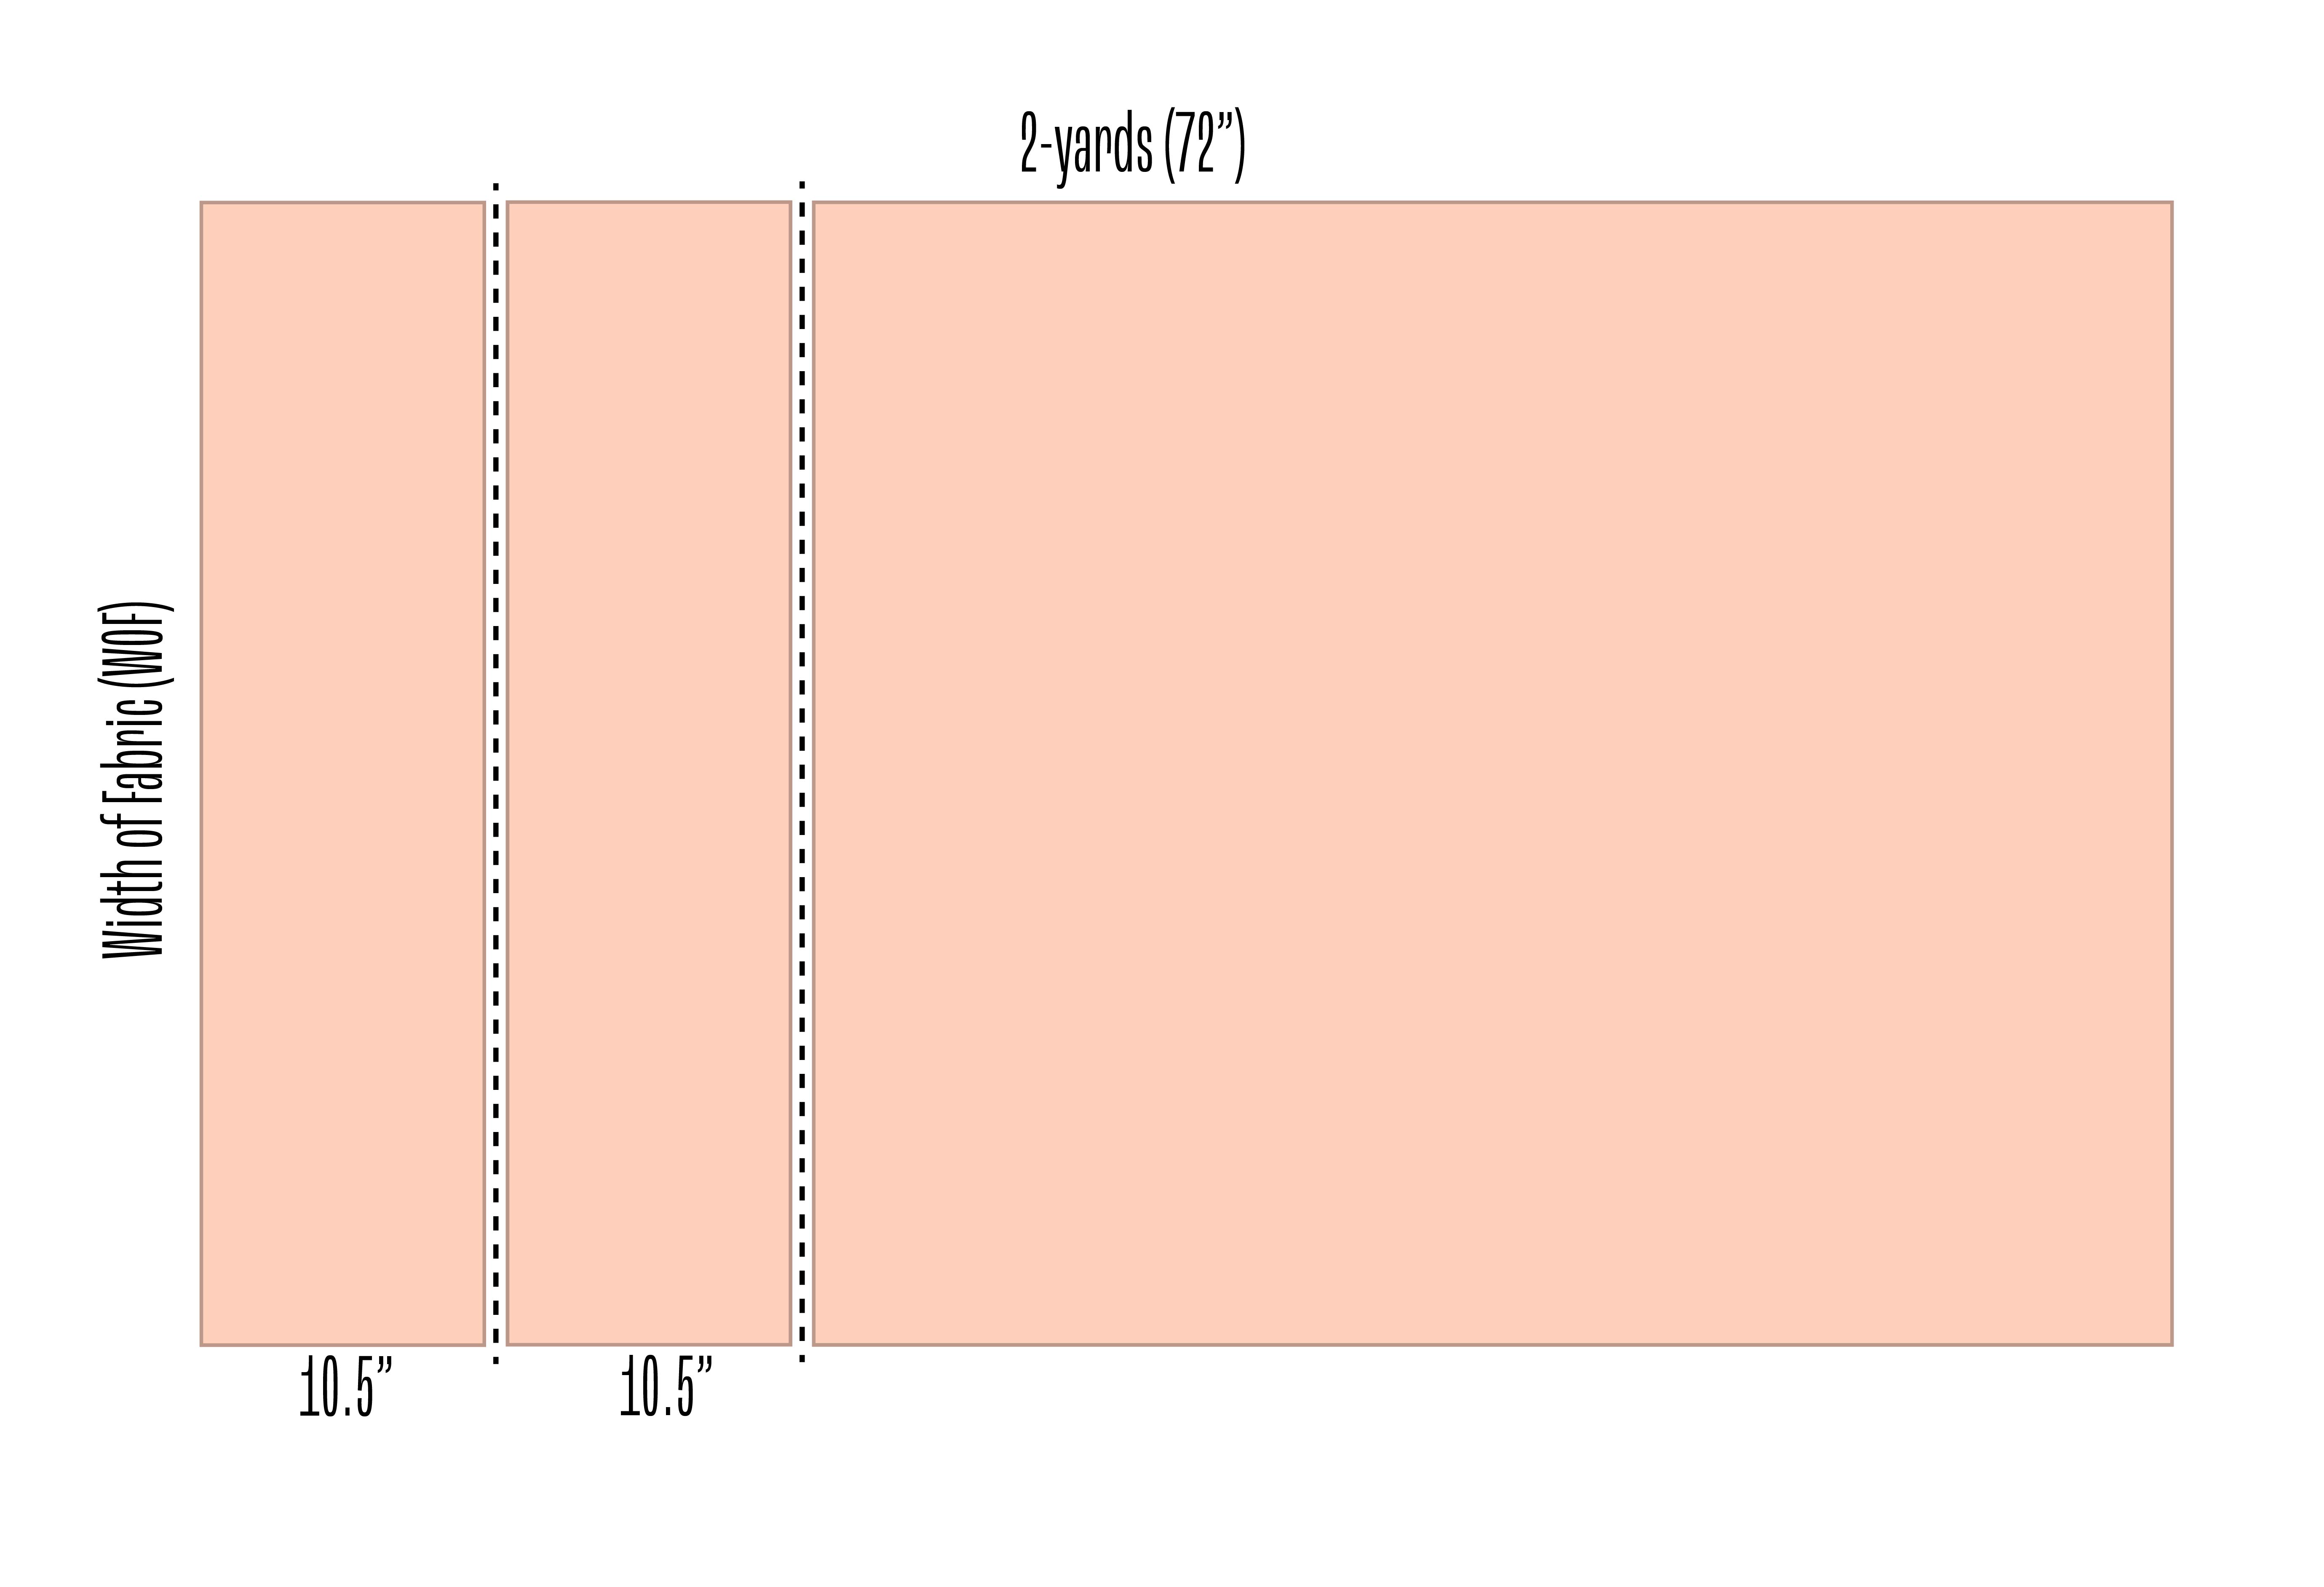 Sew two pieces together at the ends, then cut to 80.5”

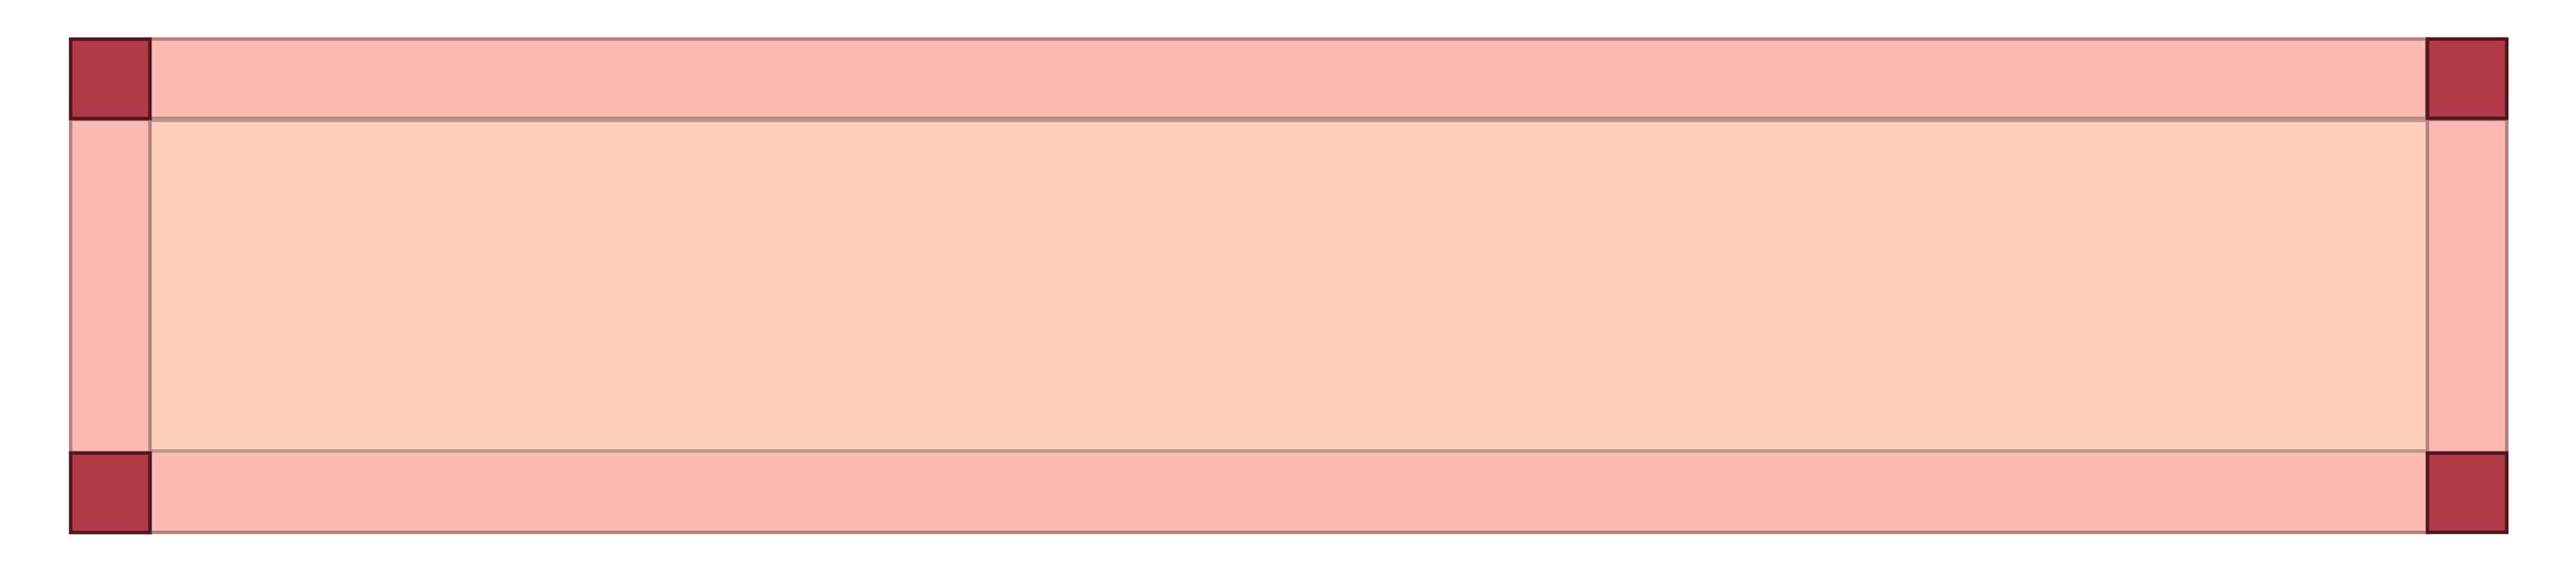
From the 5 layers chosen for the borders, cut each layer into 2.5” strips
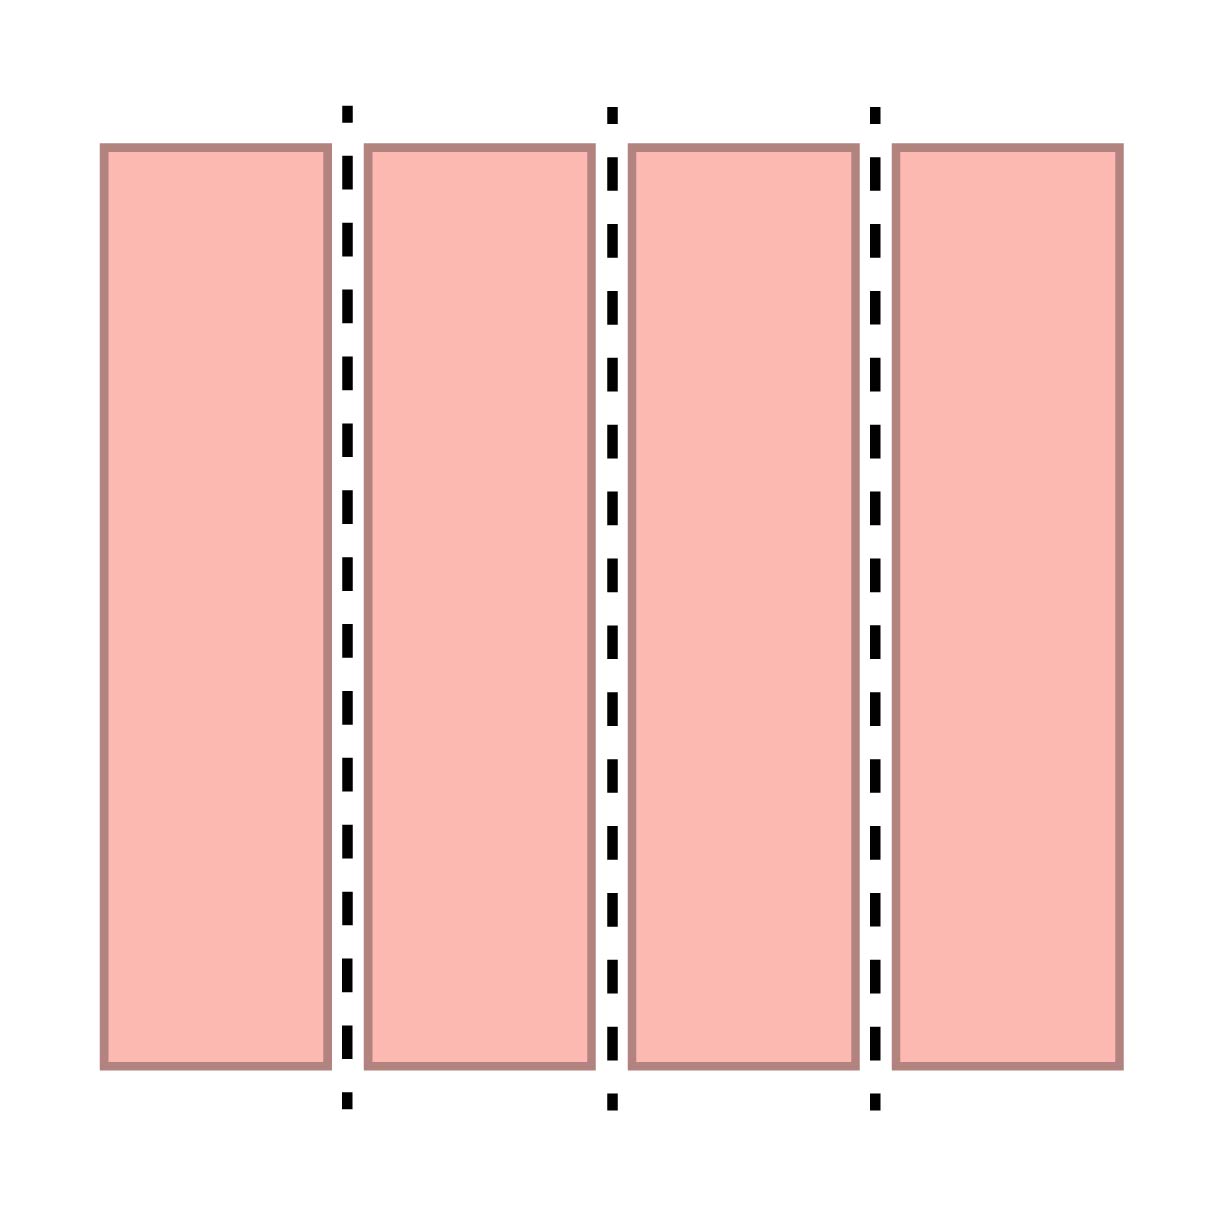
From the 1 layer chosen for the corner stones, cut 4 – 2.5” squares
Sew the 2.5” border strips together end to end, and then cut:
2 – 80.5” long pieces, and 2 – 10.5” pieces.

Sew a corner stone square to the ends of the 10.5” border pieces.
Sew the border pieces onto the runner, starting with sewing the side border pieces on first.
Time to load your INNOVA!
Load your backing fabric and batting. We used one layer of 80/20 batting and one layer of wool. The wool batting creates extra poof. The more poofy way does require more babysitting during the stitching process. Choose the batting thickness that suits your preference!
Baste your runner onto the batting. Make sure to tighten and secure the sides. The tighter your fabric, the more precise your finished project will be.
Download and open the ‘ABM Swedish Heart Runner AP’ Autopilot Mach 3 project file.
Adjust settings and reposition as needed.
Download and import ‘abmsh1’, ‘abmshborder’ and ‘abmshcorner’ .Pat files.
Place ‘abmshborder’ and ‘abmshcorner’.

Use pushpins to define the border area for your runner.


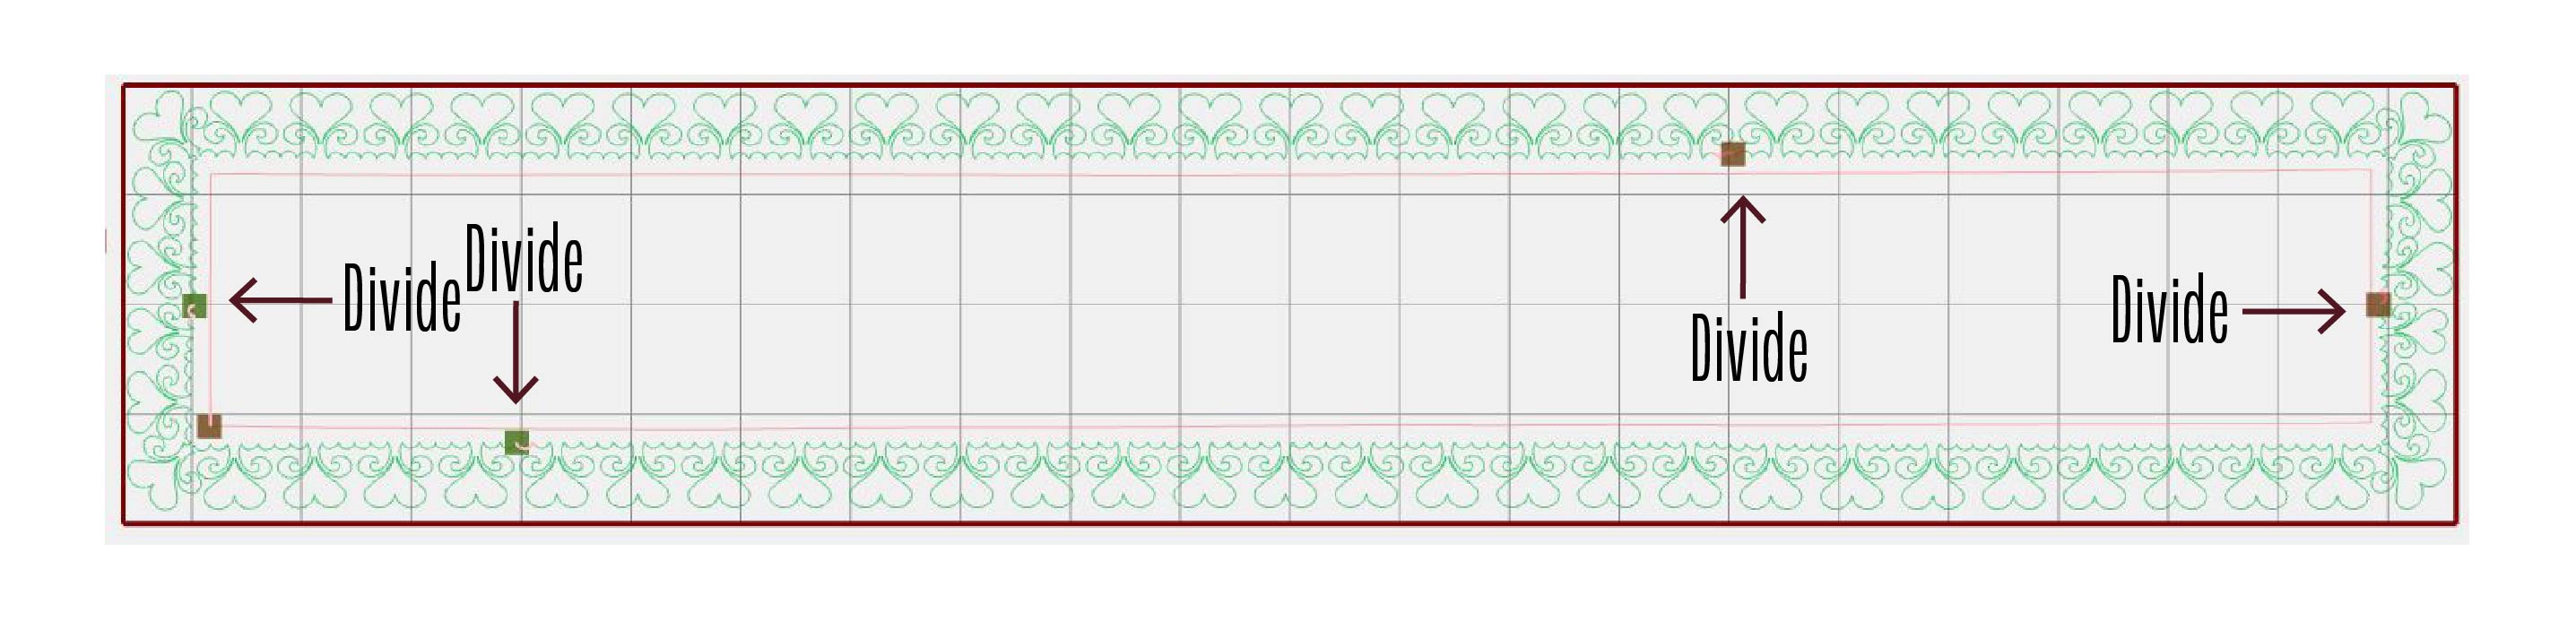
Using tools such as Group, Transform, Endsnap and Divide, create the entire border for the runner.
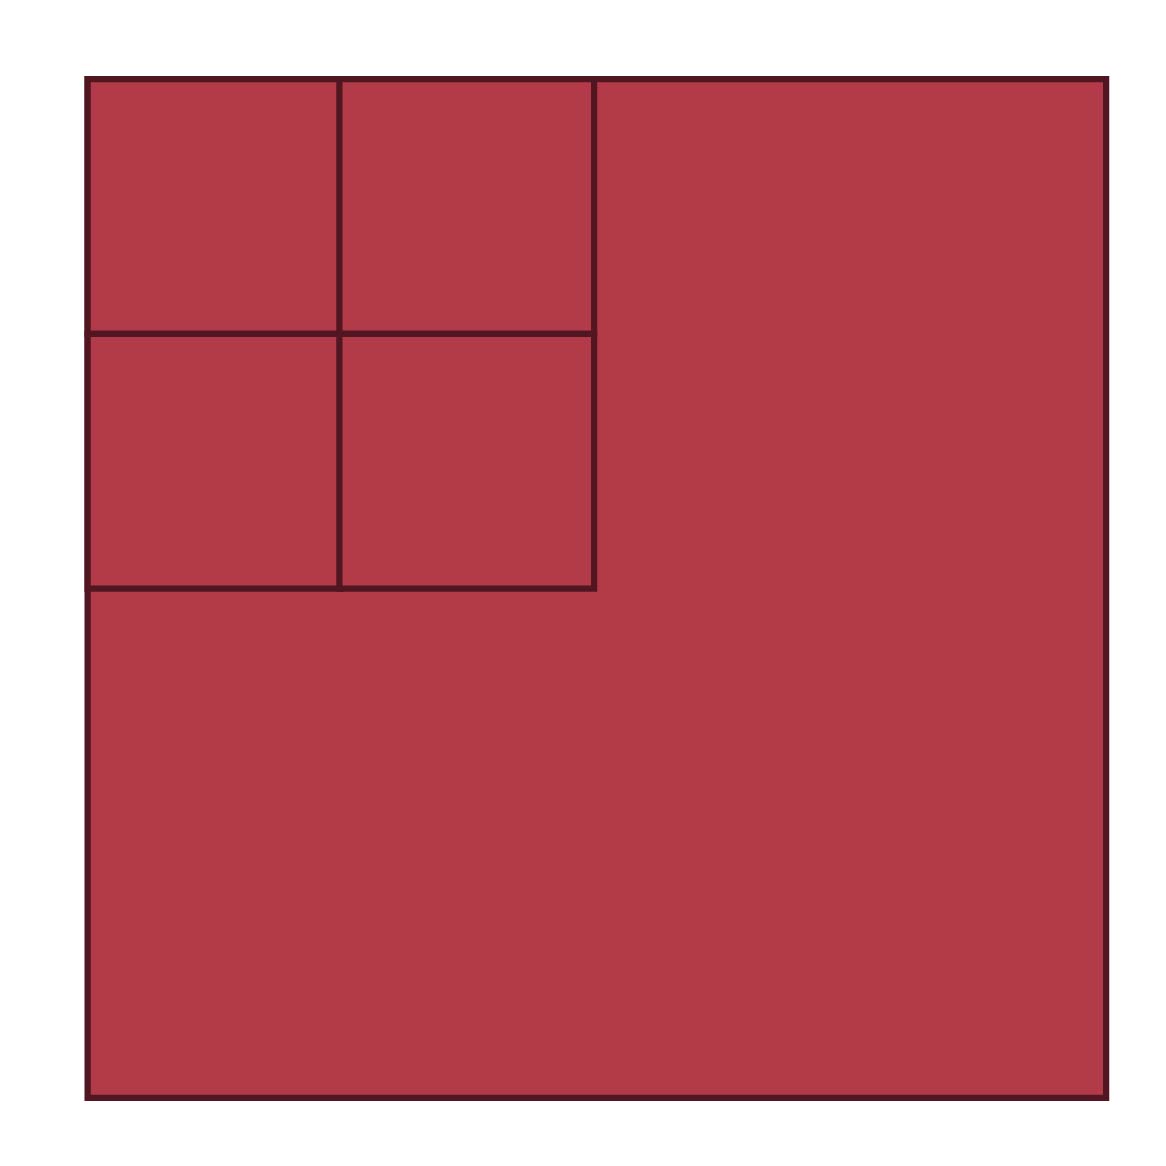
Use the divide tool to divide the border as shown:
 Dequeue all the border pattern pieces.
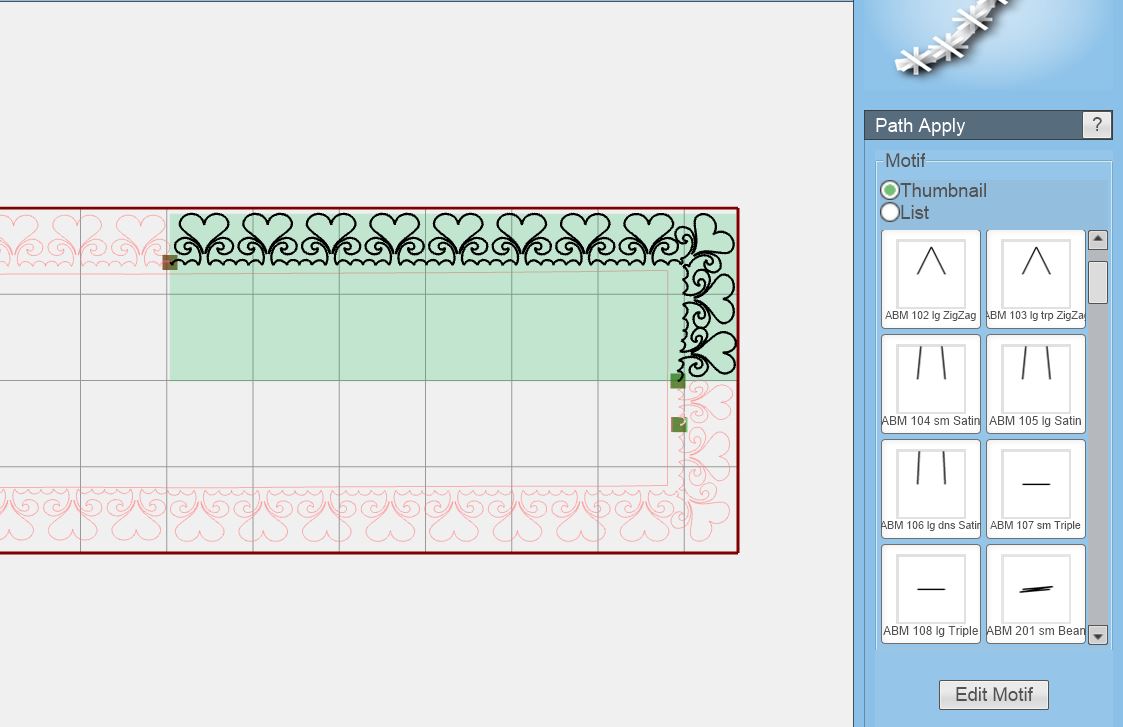
Select the upper left border section.

Using the path apply tool, apply the small bean stitch.
Stitch this first upper left part of the border section. We are using INNOVATech thread in Taffy for this stitching.
After stitching the first border section, use the pushpin tool to place pushpins along the next section of the border to check shrinkage/draw.

Adjust the border pattern as needed using tools such as Transform or Morph.
Apply the same small bean stitch to the next border section using the path apply tool.
Stitch this border section.
Continue the steps above to complete the border.
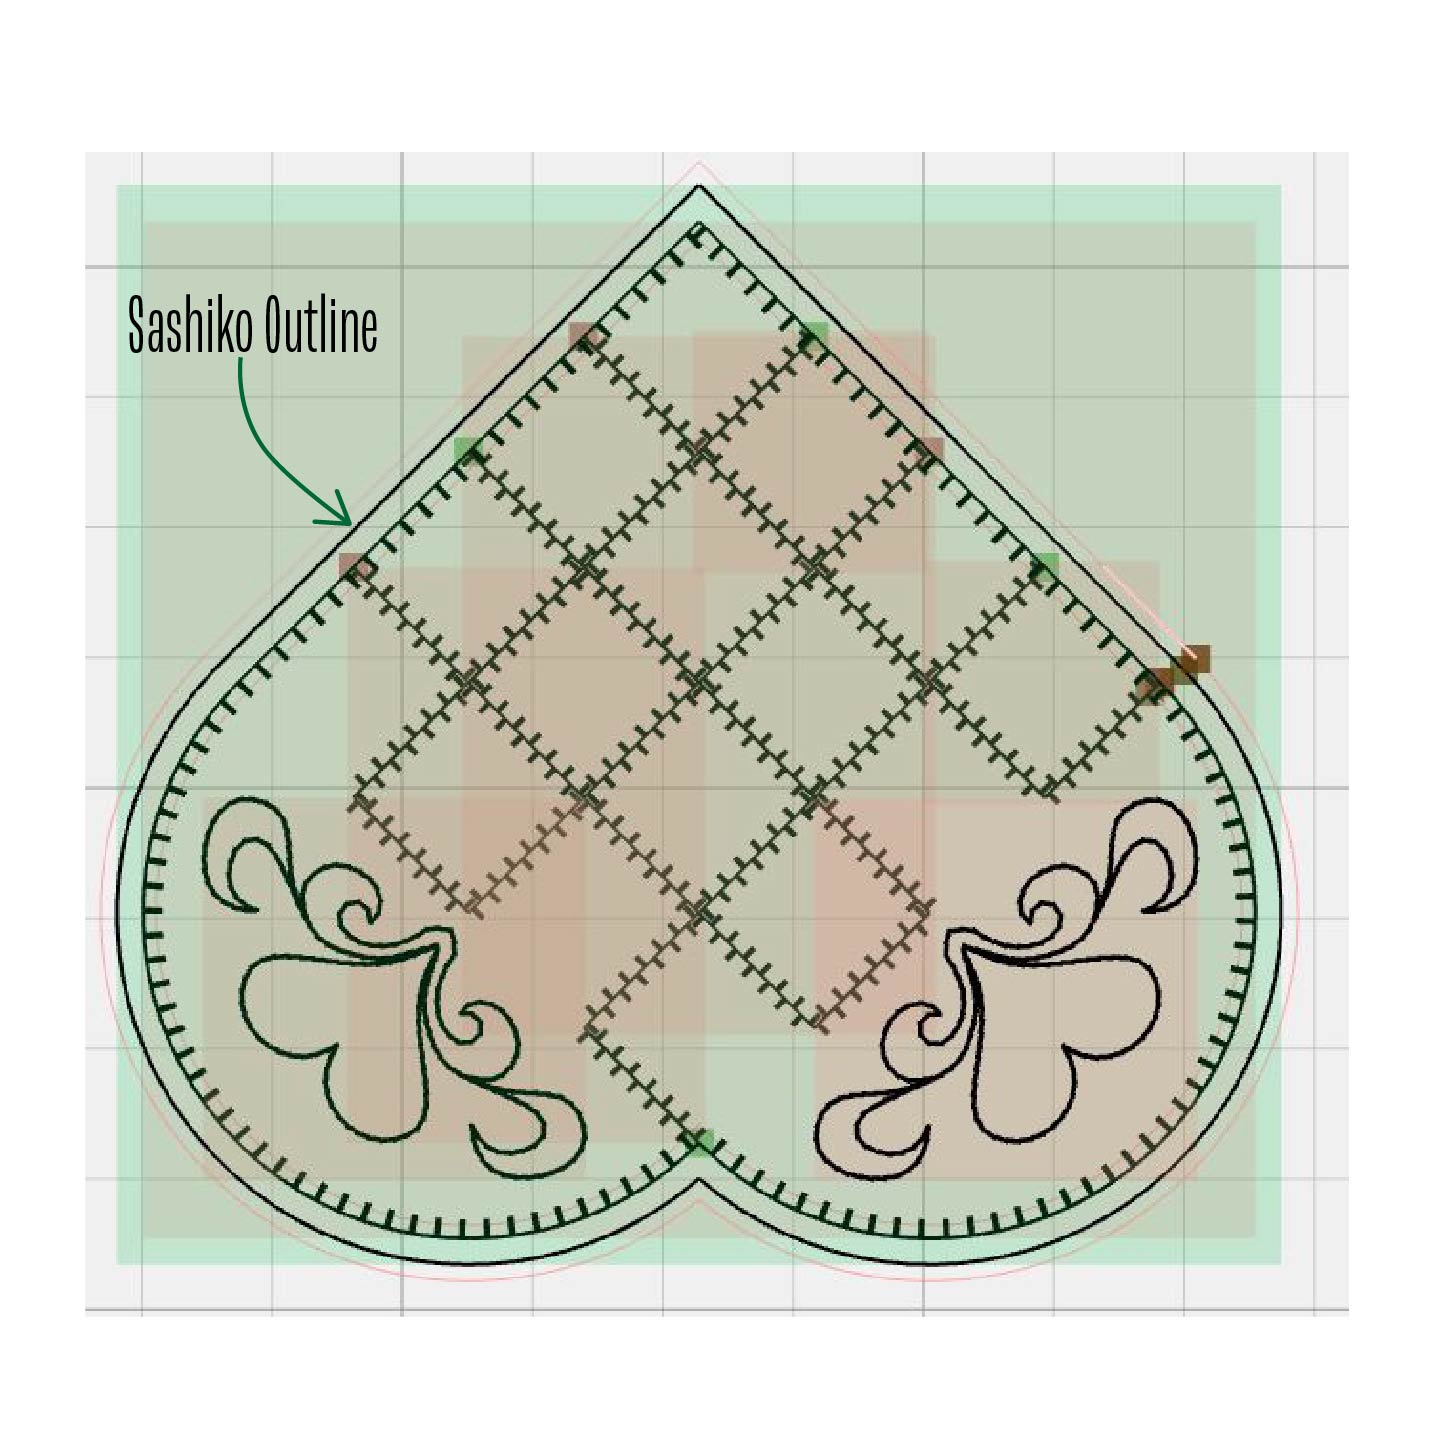
Place the pattern abmsh1.

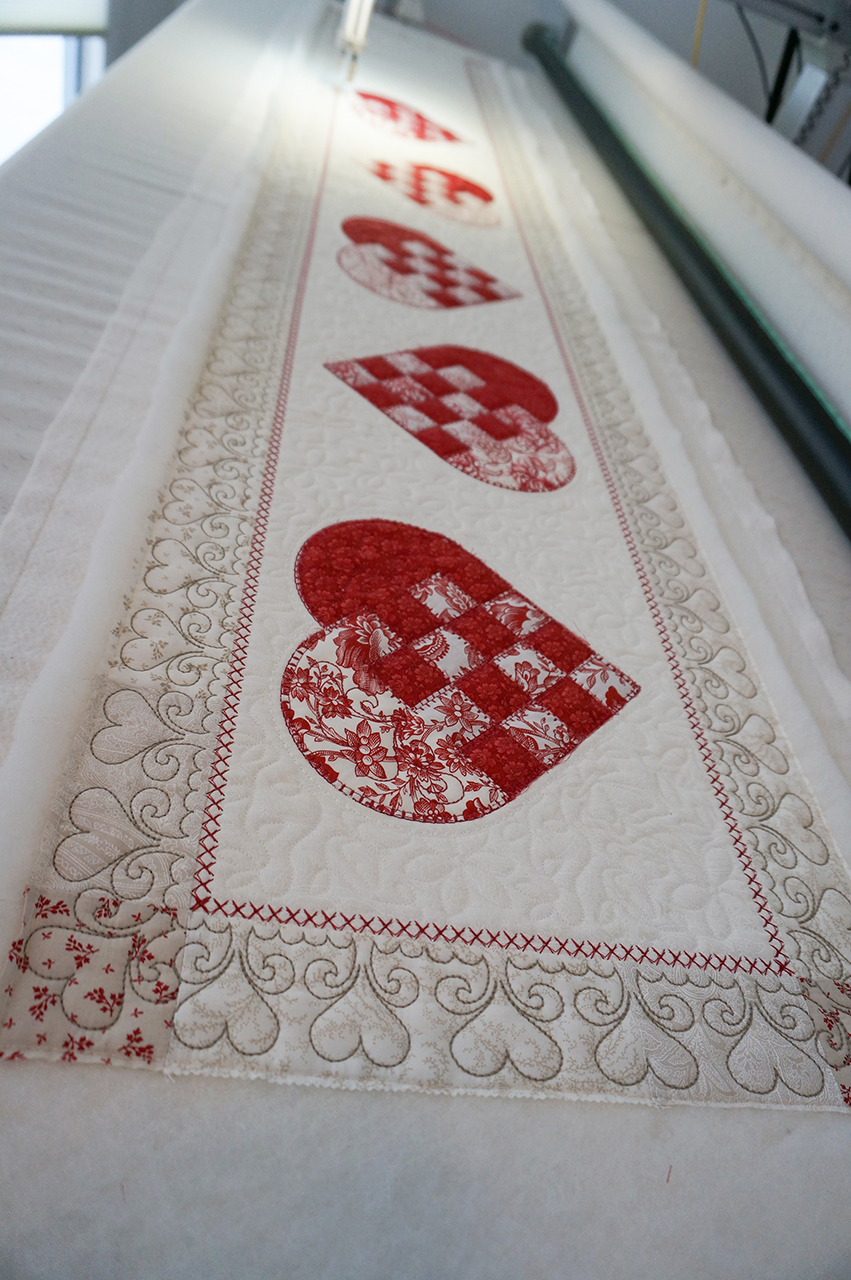
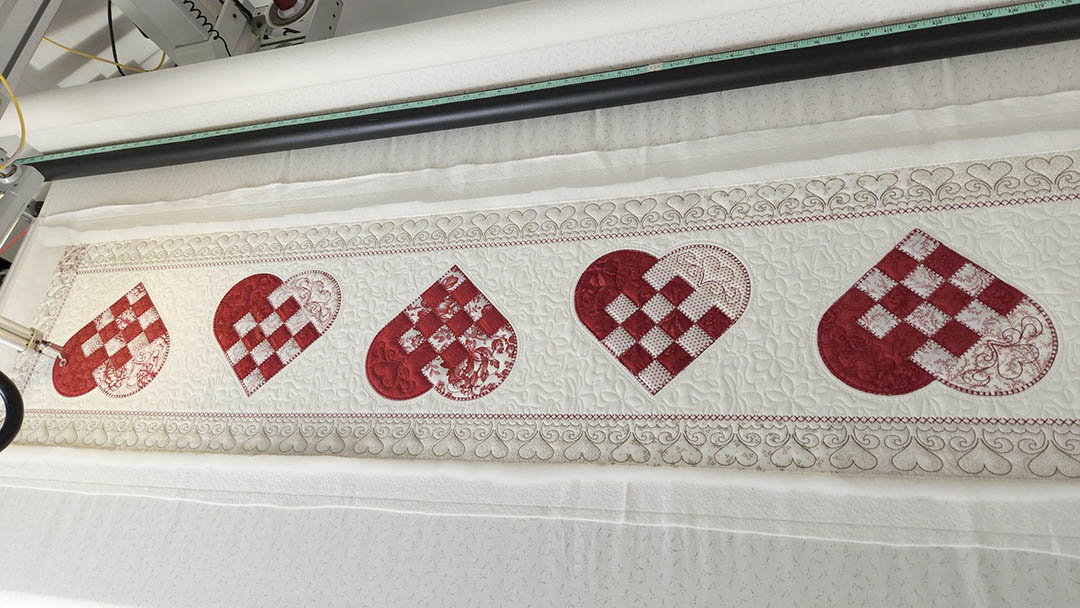
Using the copy and paste tool, place 7 hearts along the runner alternating in direction.
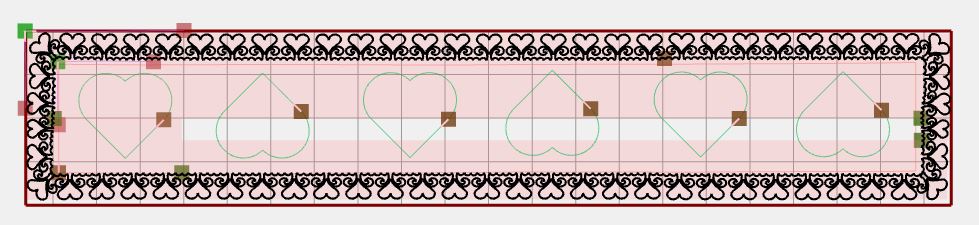
Dequeue all the hearts.
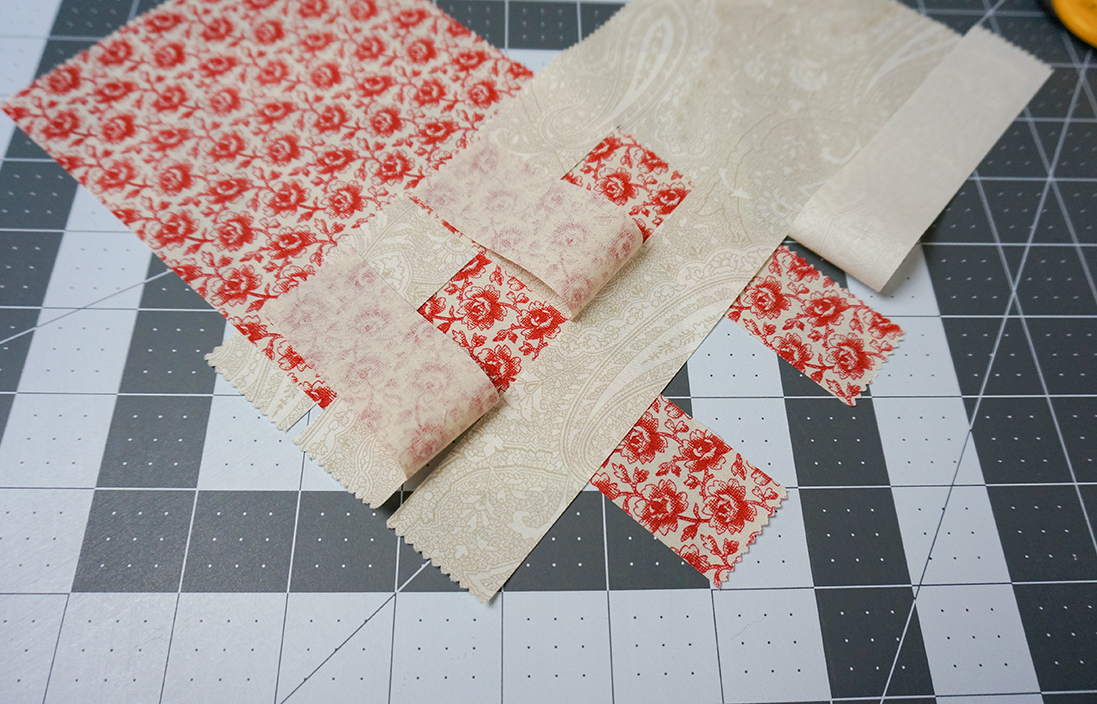
Prepare fabric for the hearts
Using the 8 layers chosen for your hearts, pair up the layers.
Place one dark and one light layer together.
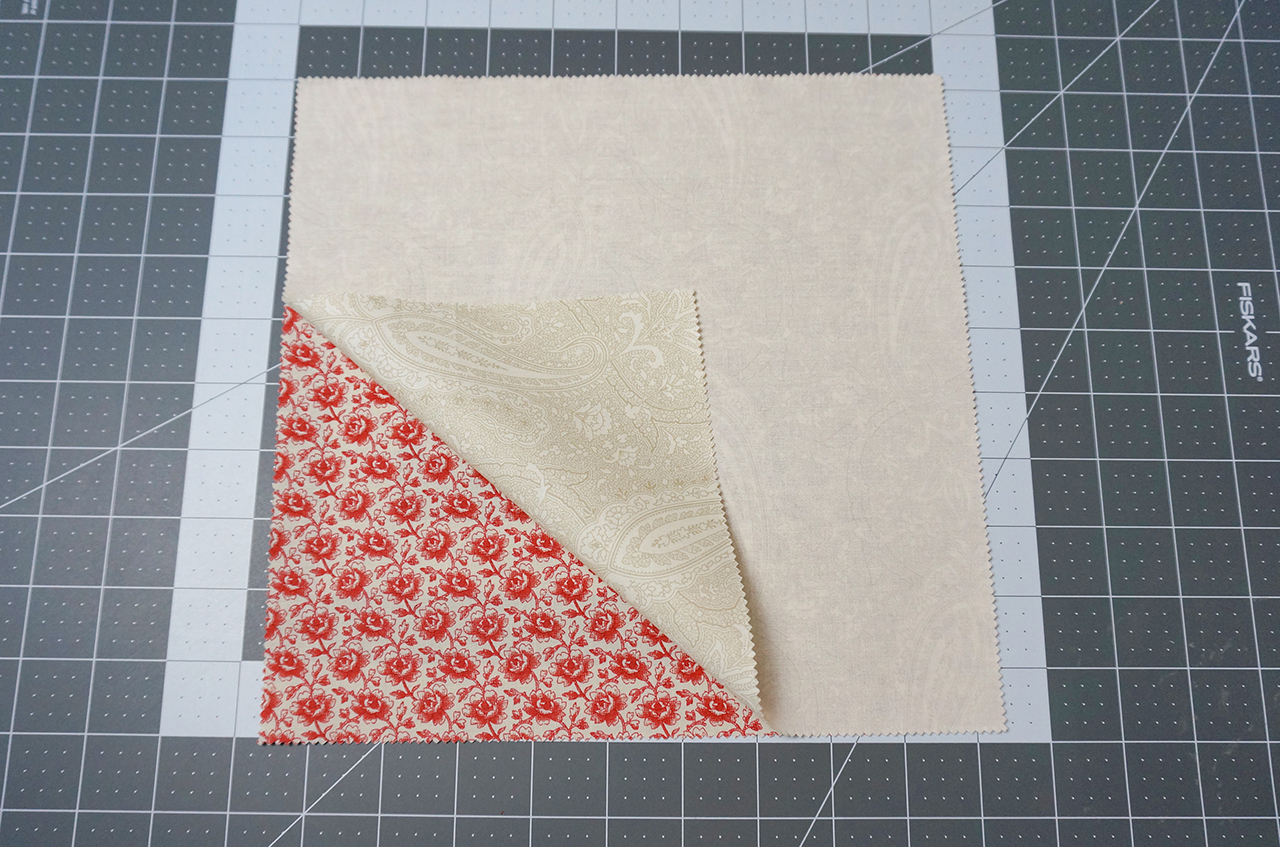
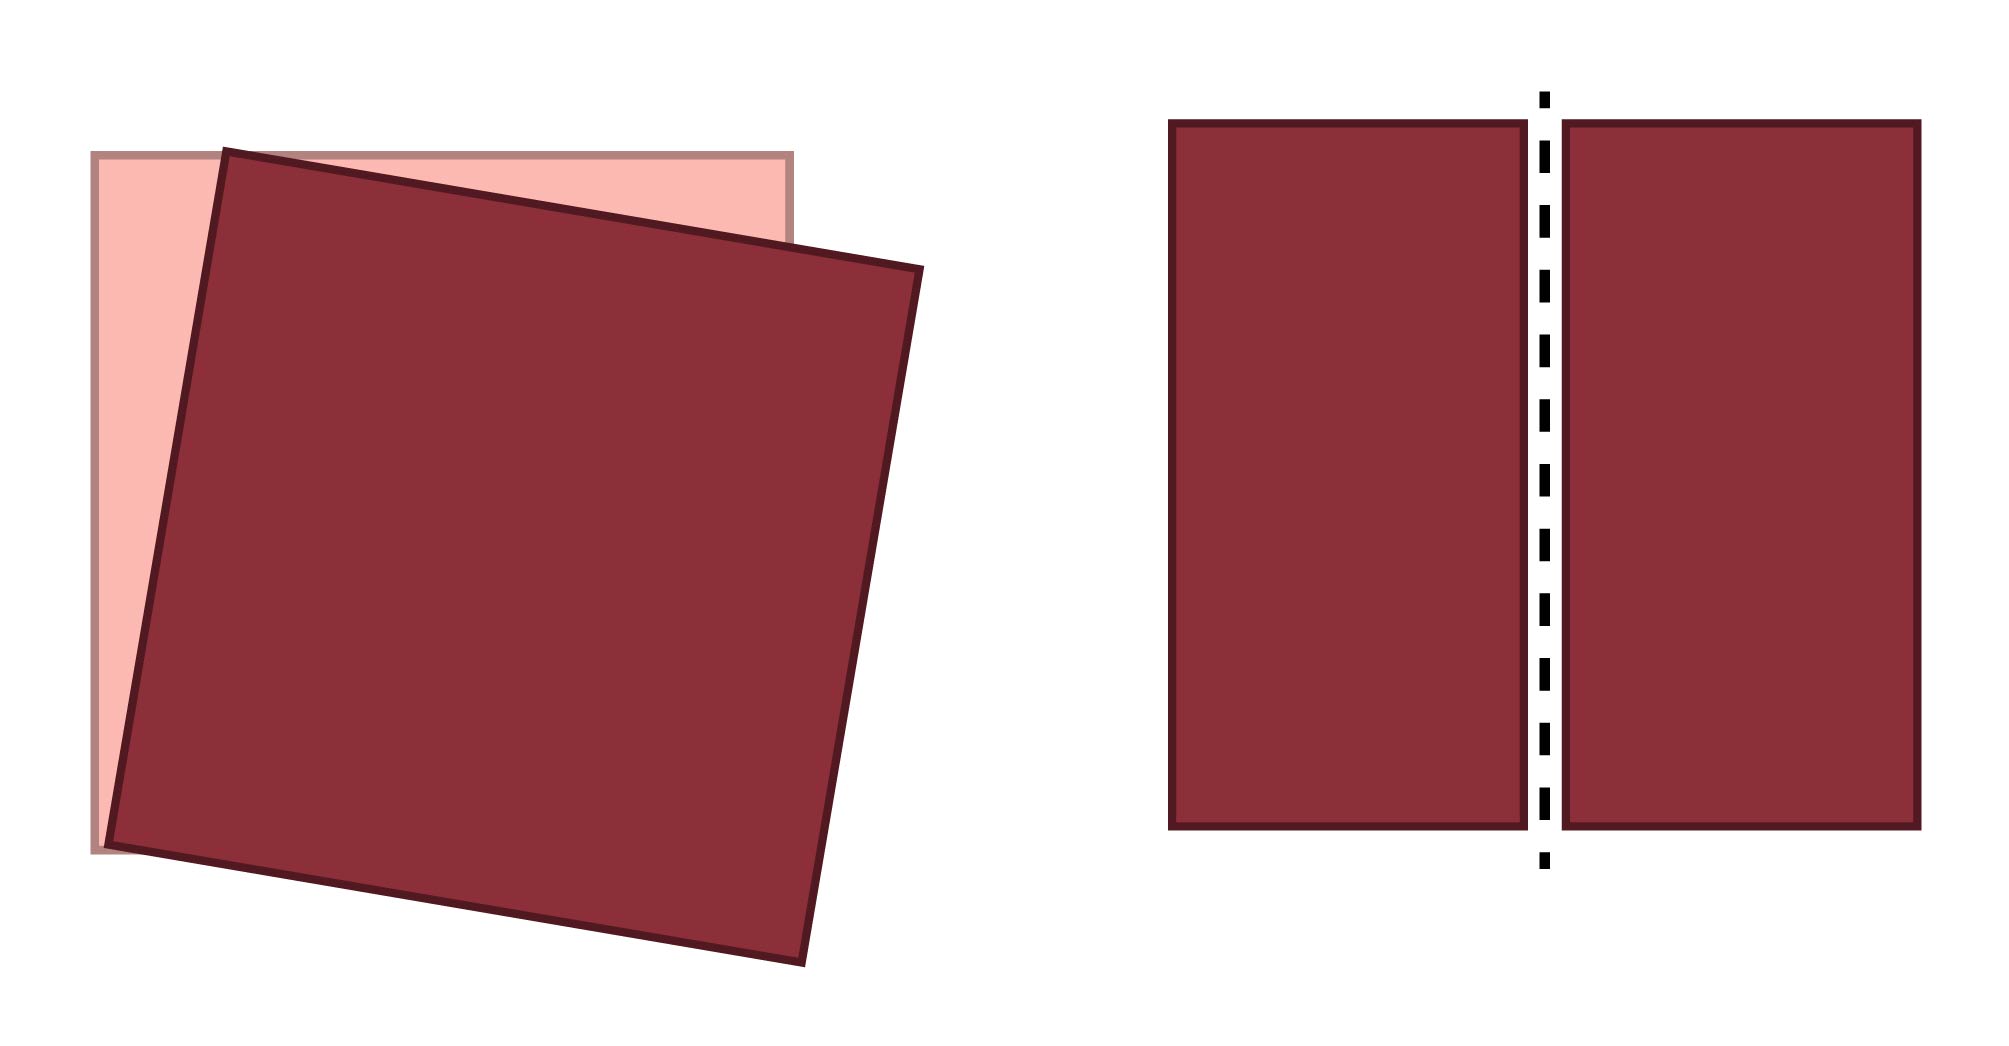
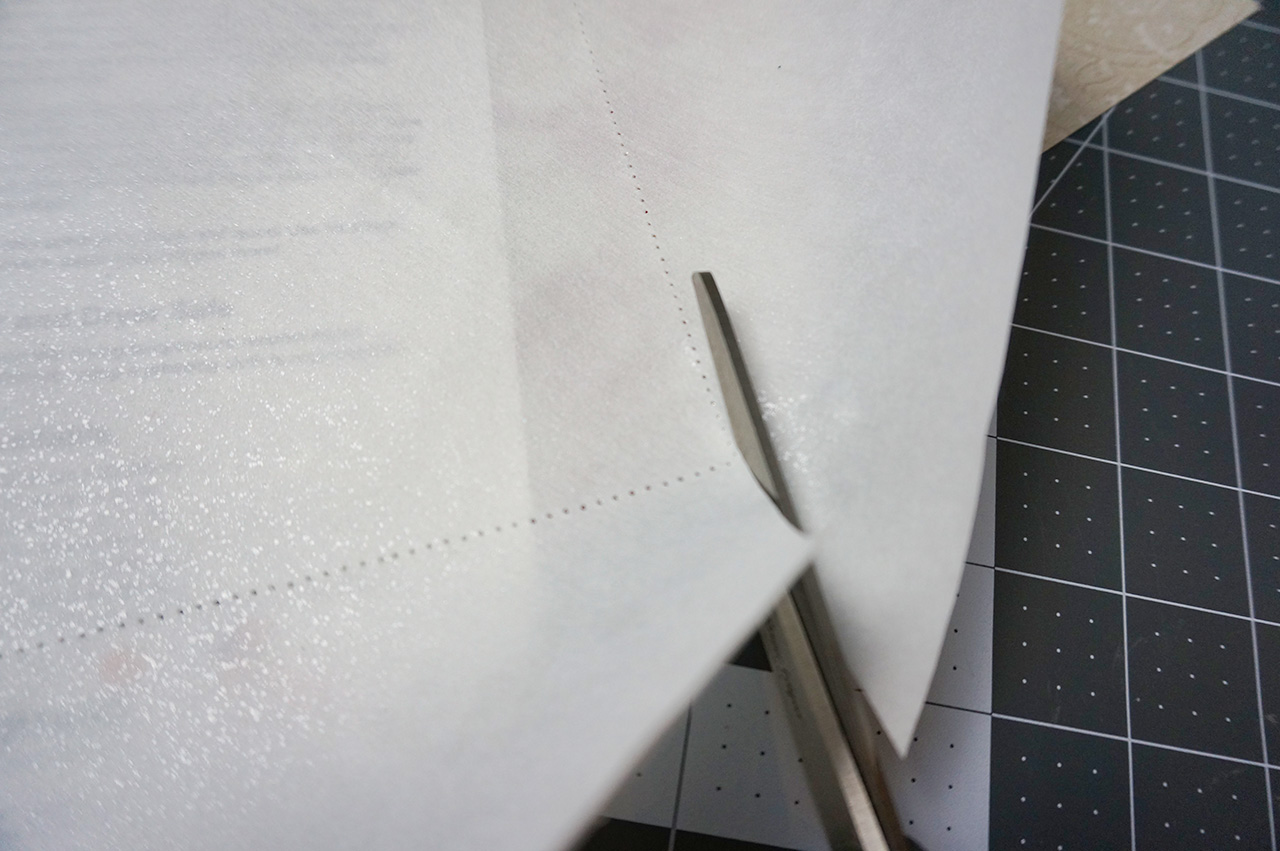
Cut in half through both layers.
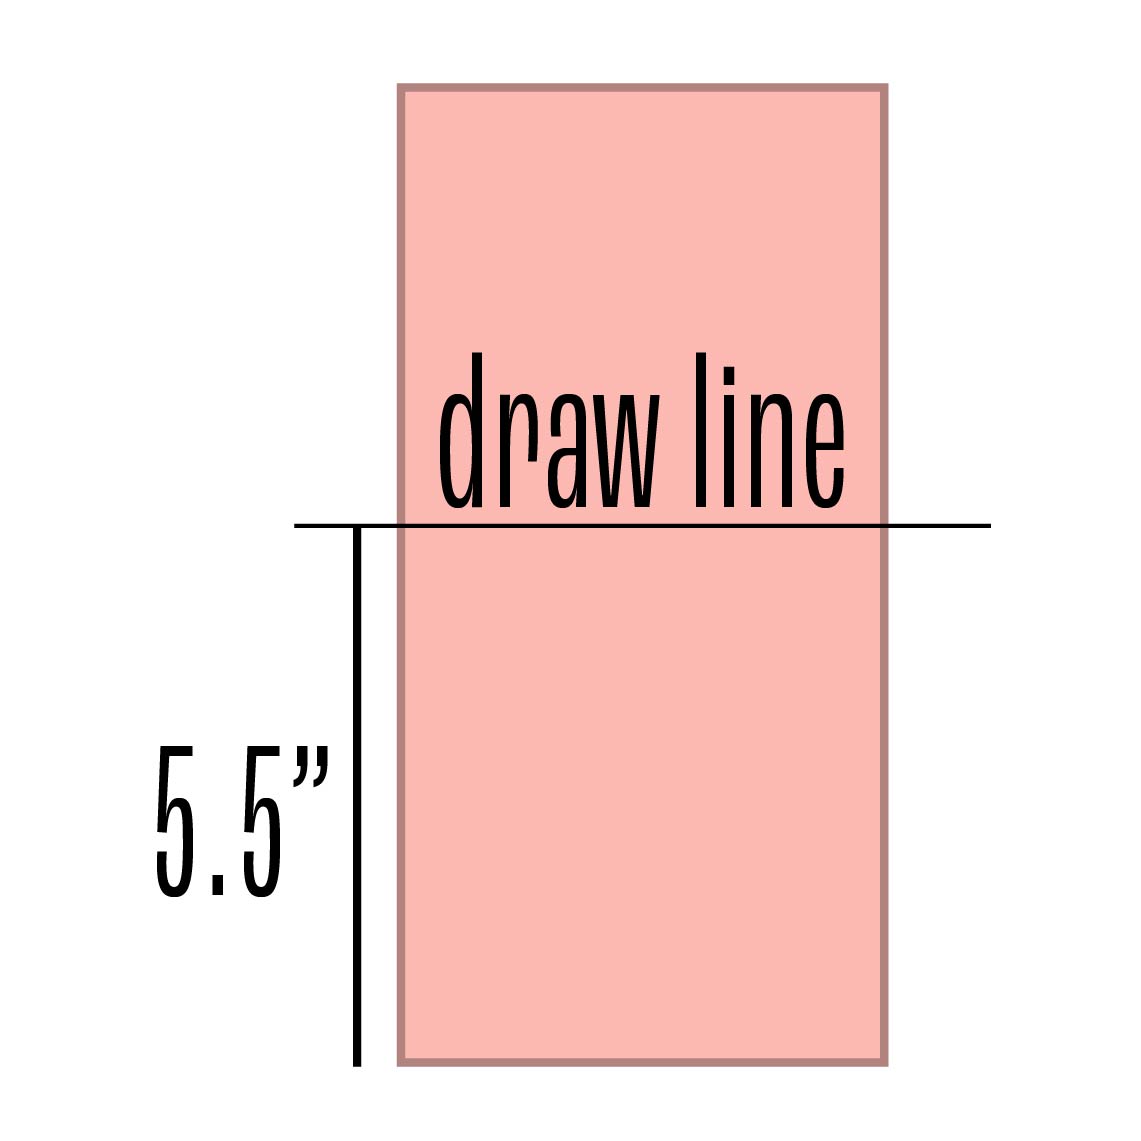
Draw a line across the set at 5.5” inches
Mark along the line and near the edge at 1.25” increments.
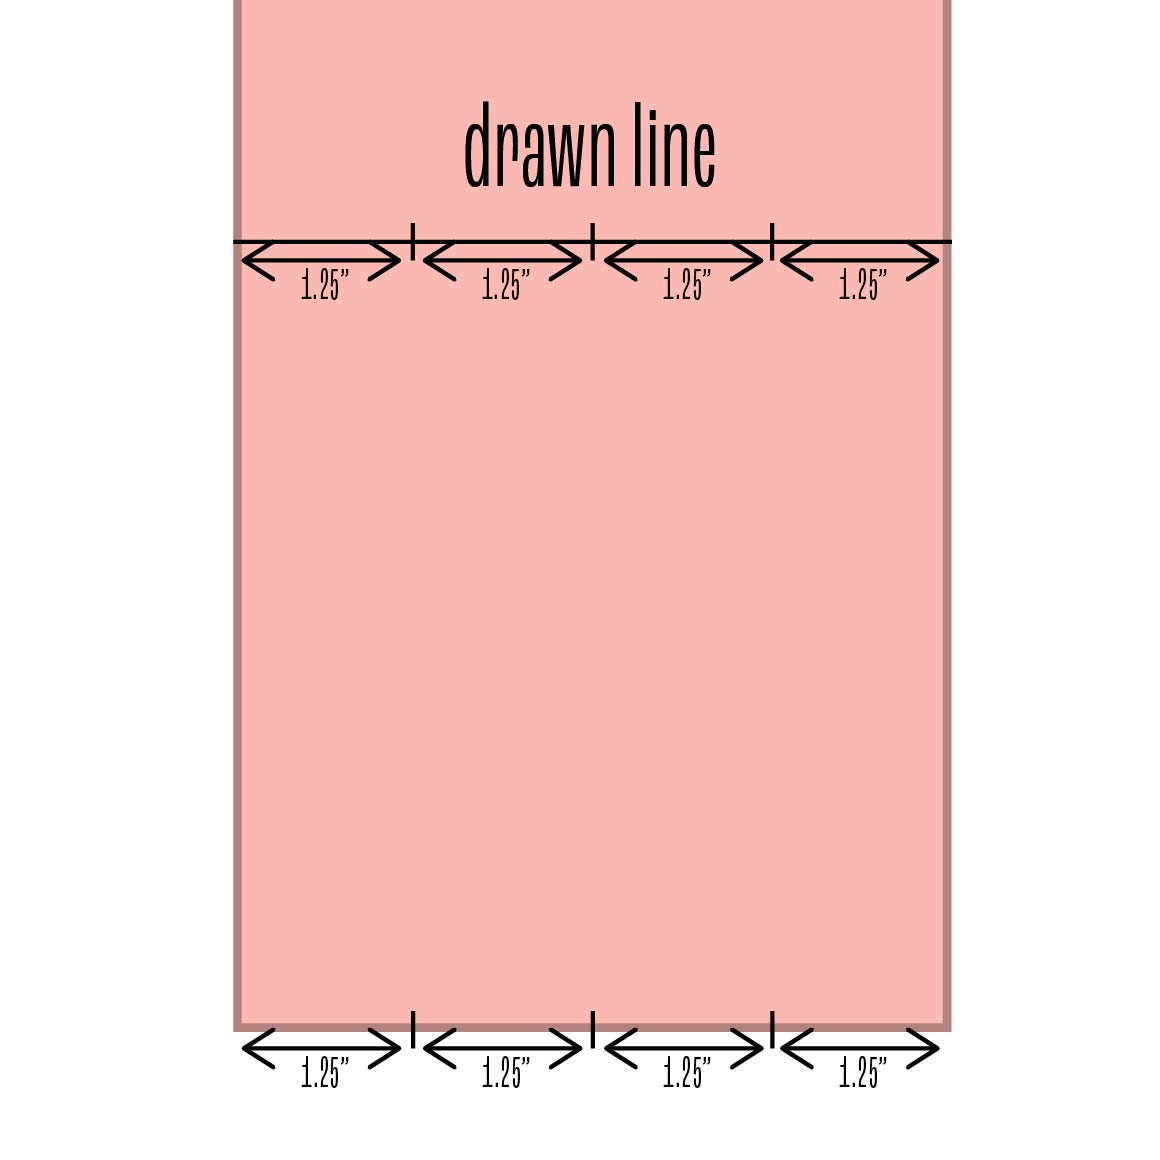
Line up your ruler with the marks and cut.
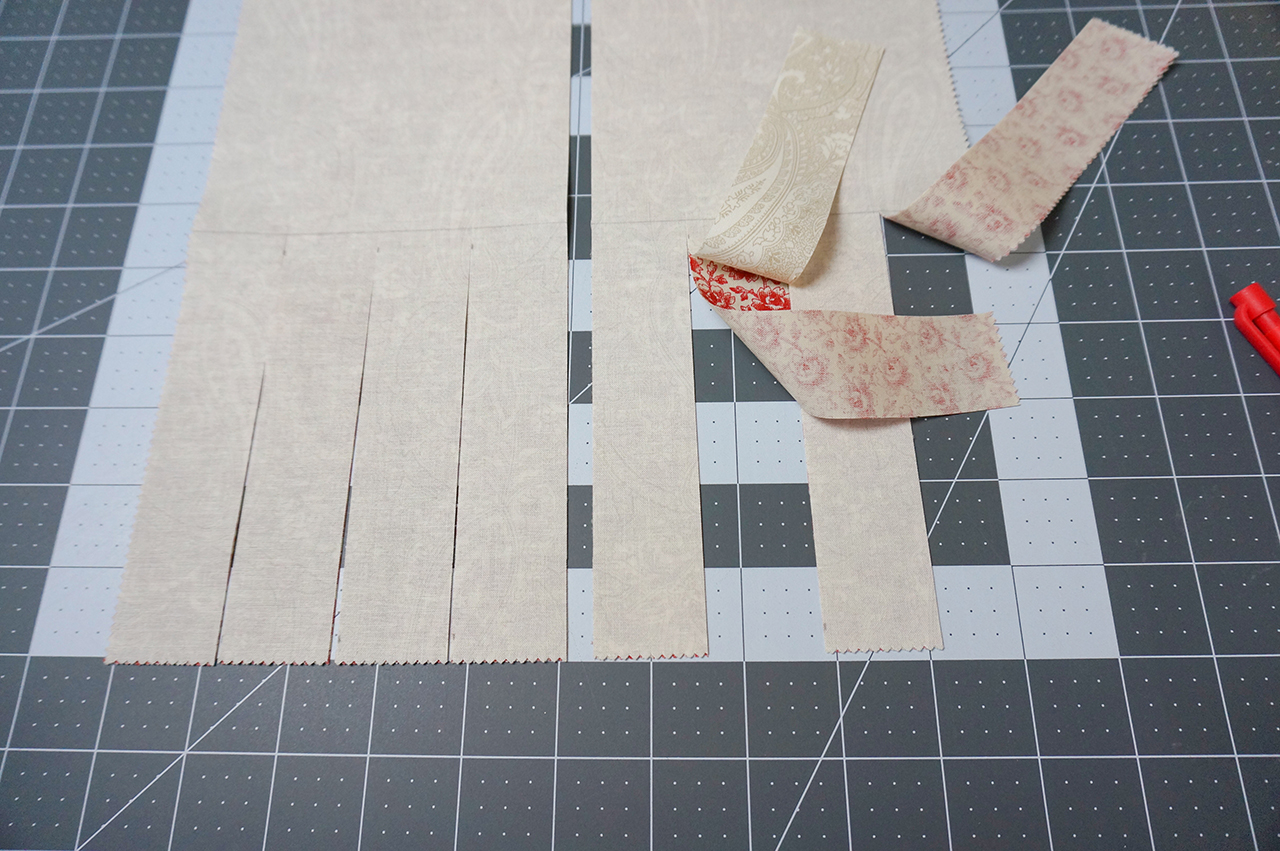
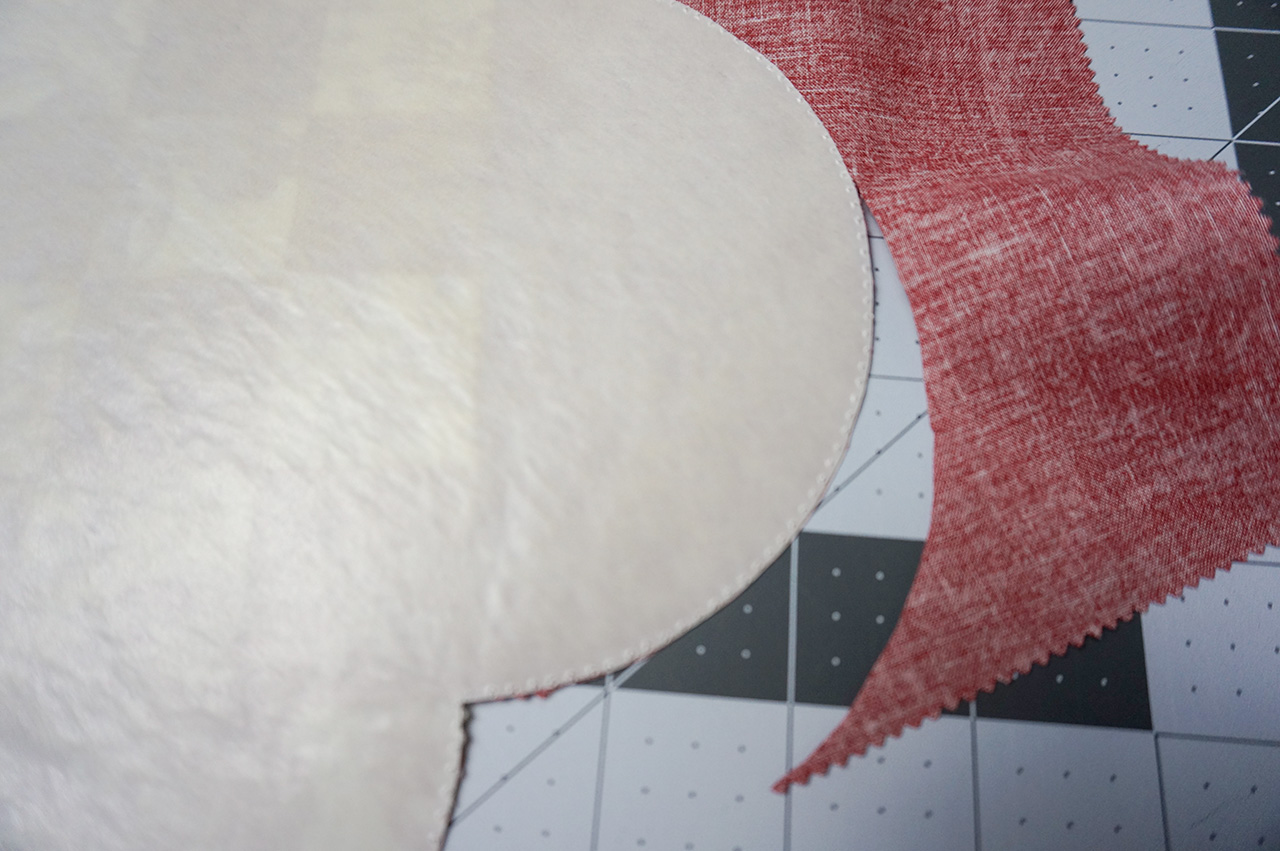
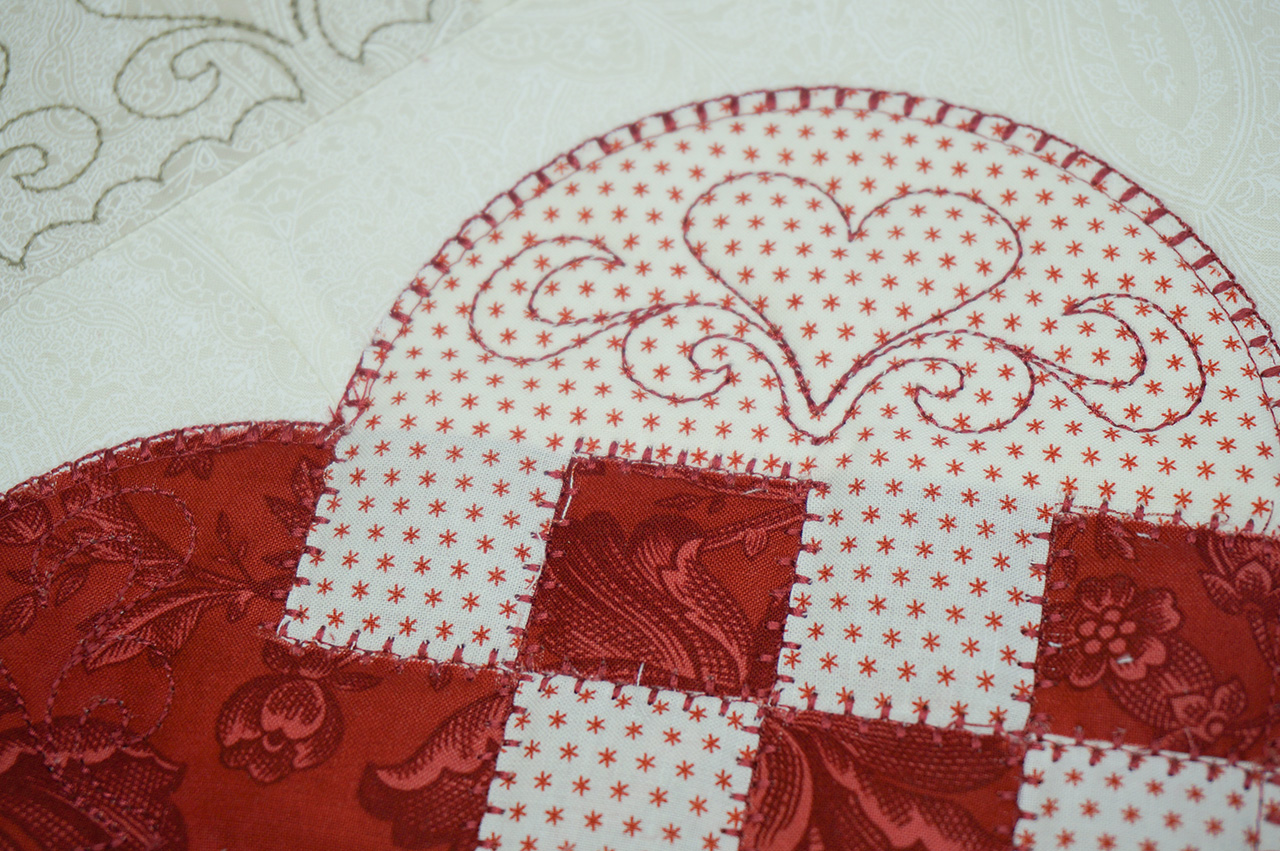
Following the photos below to weave the Swedish Hearts.

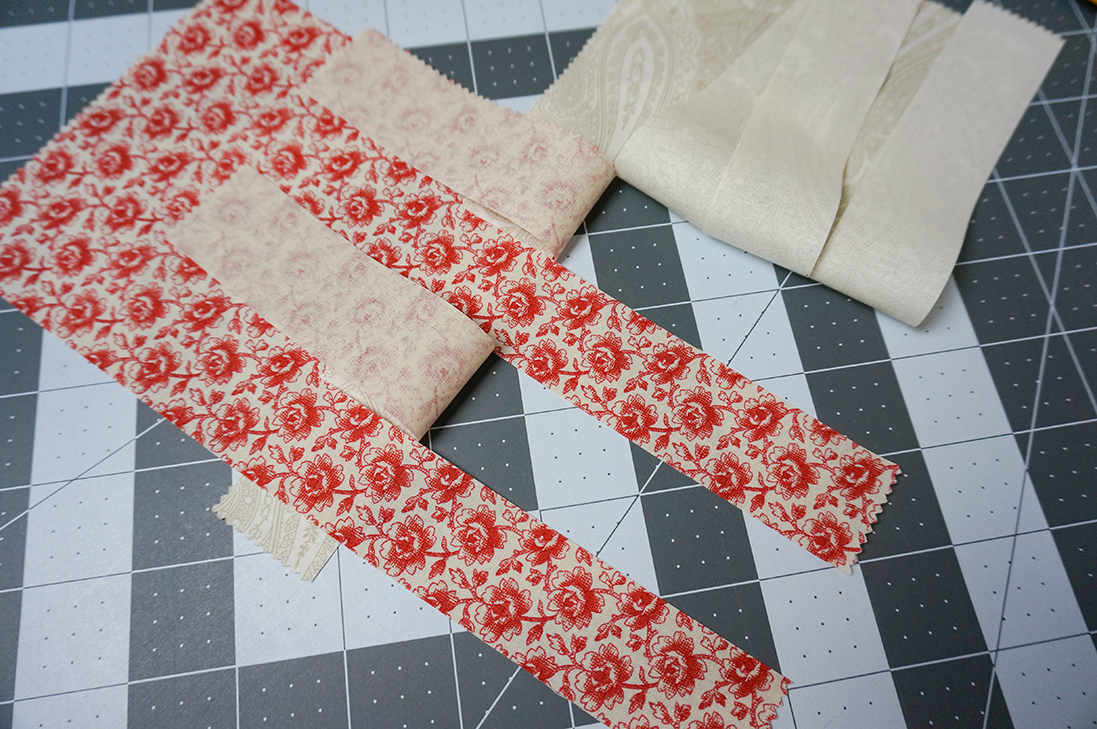
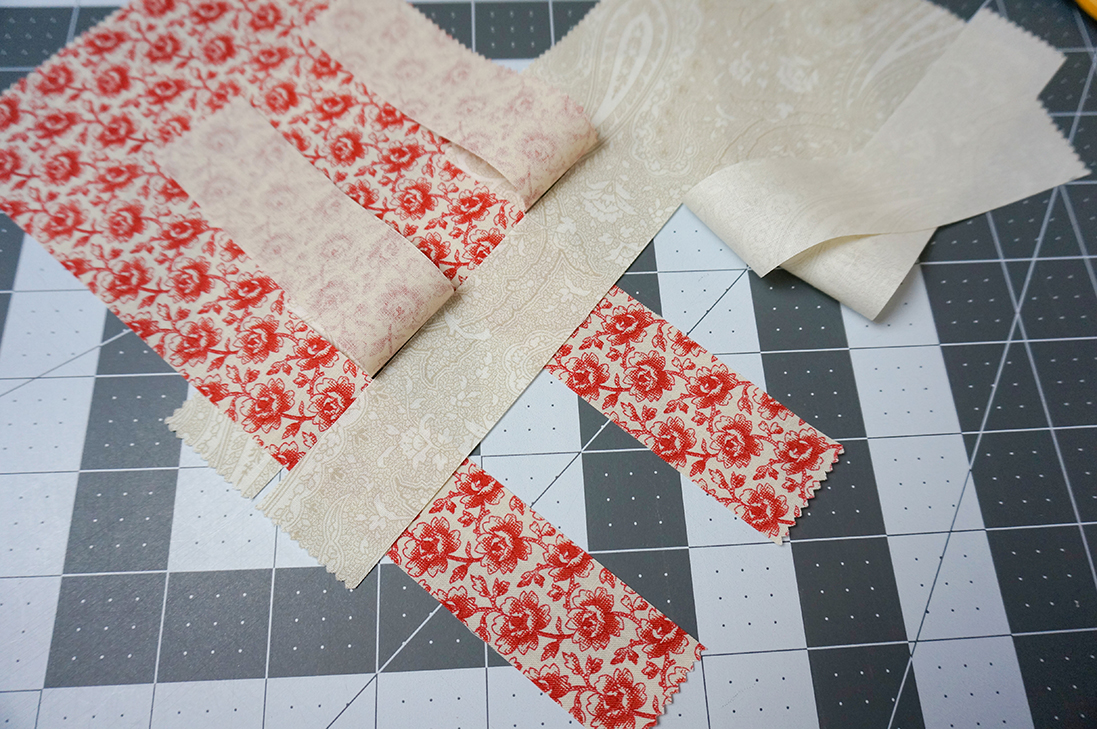
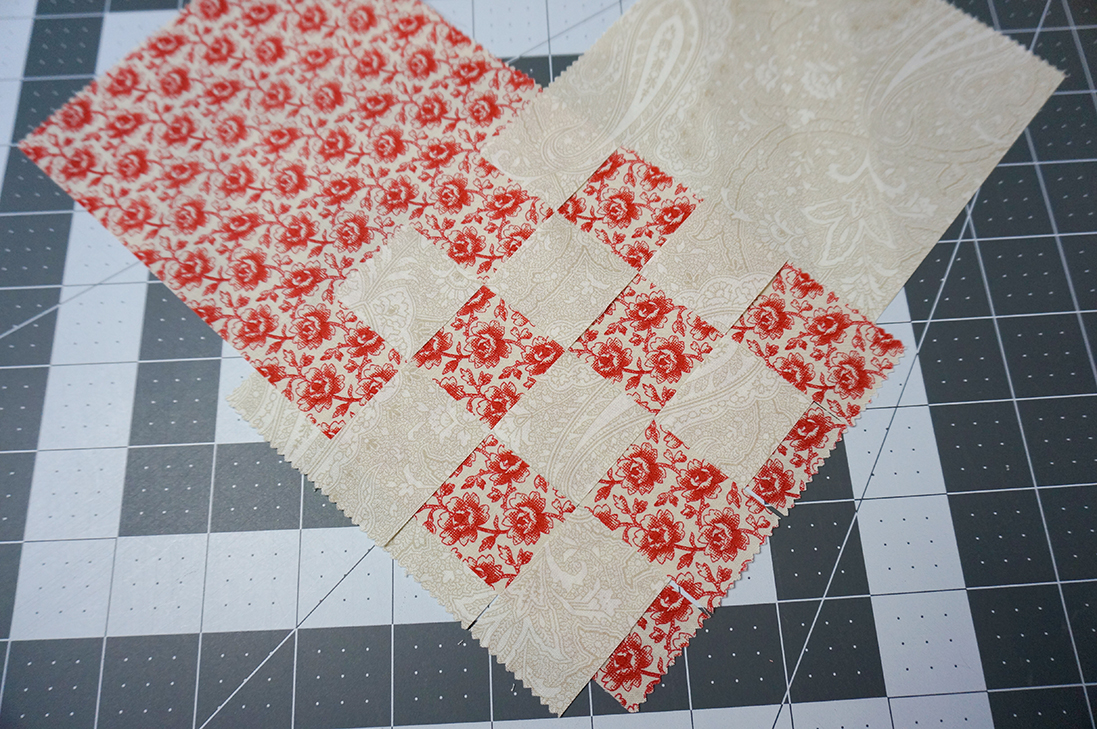
Repeat to create 8 woven Swedish Hearts.
Applying Swedish Hearts to the runner
We tried two methods when applying the hearts:
Method 1:
*The heart weave will be more poofier with this method, but requires more fussing, slower stitching and more babysitting during the stitch out.
1. Stitch a placement line on the project.
2. Place the Swedish Heart fabric down.
3. Using the Echo tool create a stitch down line, Echo the Heart pattern at .1 inside.
4. Stitch the echoed heart pattern.
5. Trim the excess fabric.
Method 2:
Using Select Appli-stick, this flattens the weave a little, but the project is easier to manage.
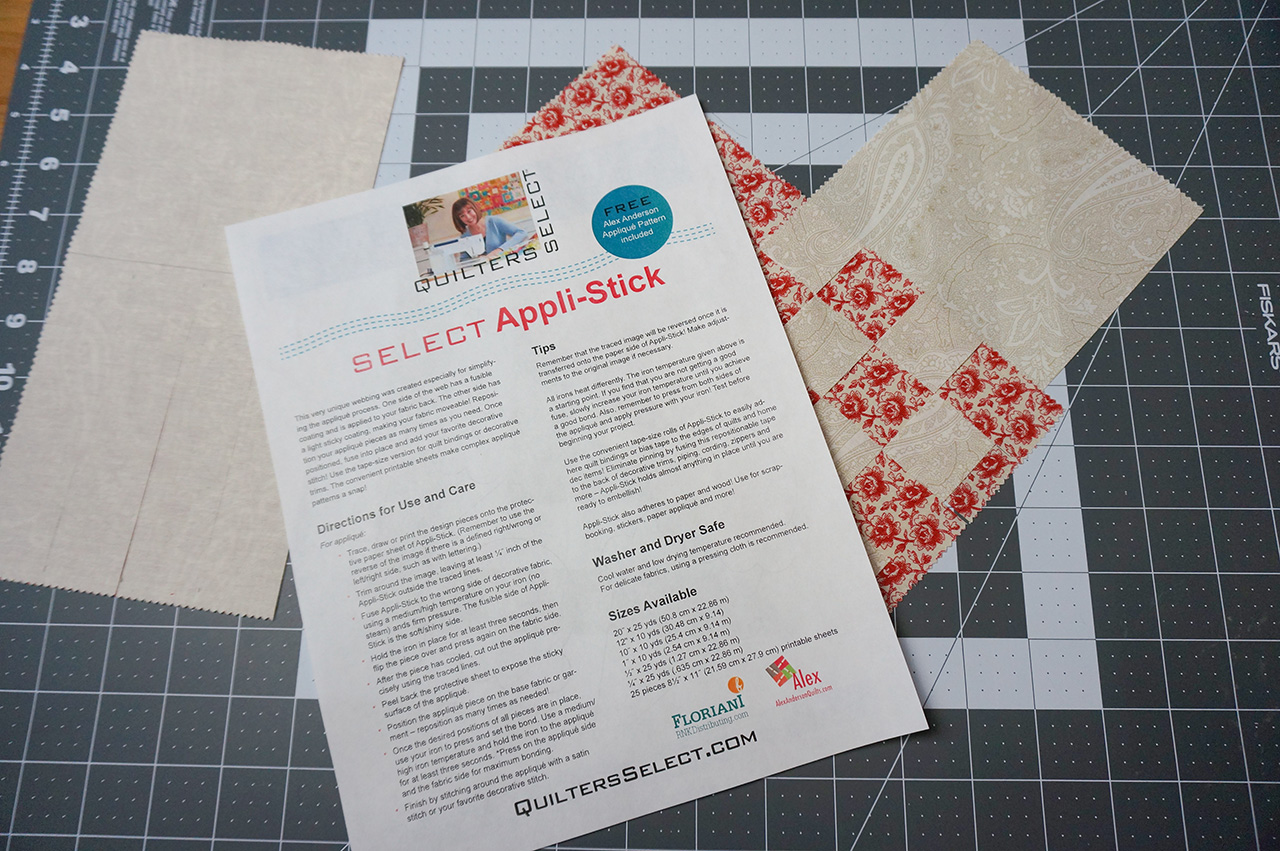
Place down Select Appli-stick and stitch heart pattern without thread.
Cut the Select Appli-stick along the punched pattern line.
Iron the cut Select Appli-stick to the back of the woven Swedish Heart. We're using the Oliso iron which we LOVE!

Trim the fabric.
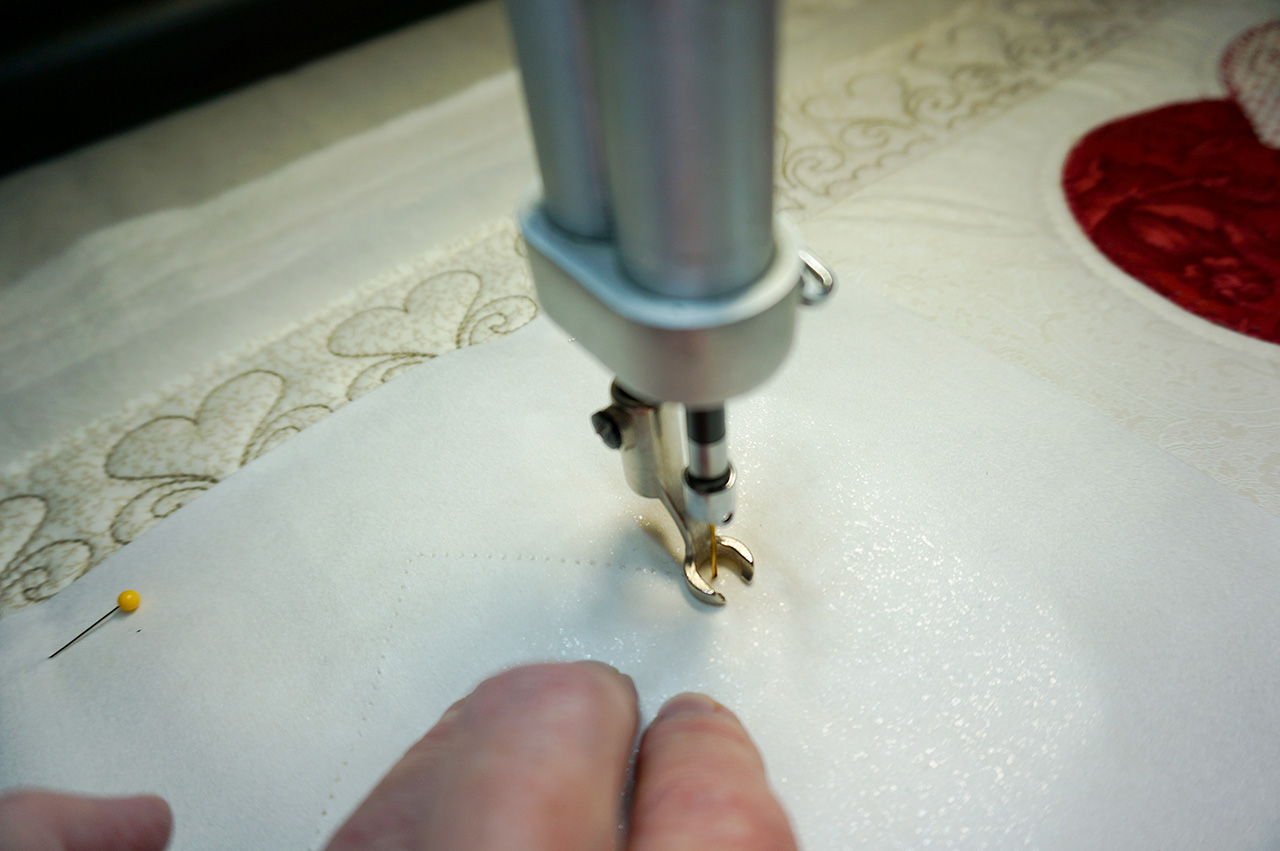
For a placement line, stitch the heart pattern on your runner.
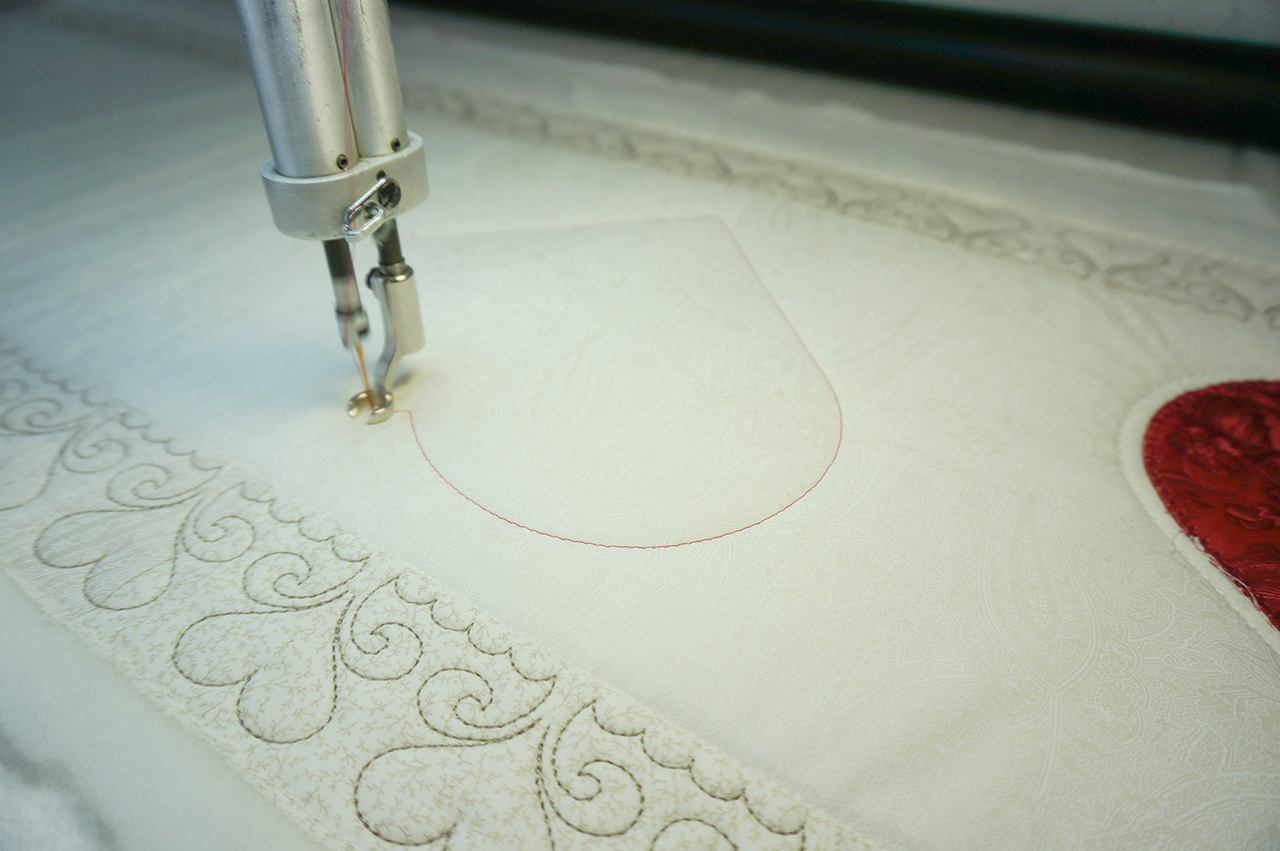
Peel and stick the woven Swedish Heart
Using the Echo tool create a stitch down line, Echo the Heart pattern at .1 inside.
Stitch the echoed heart pattern.
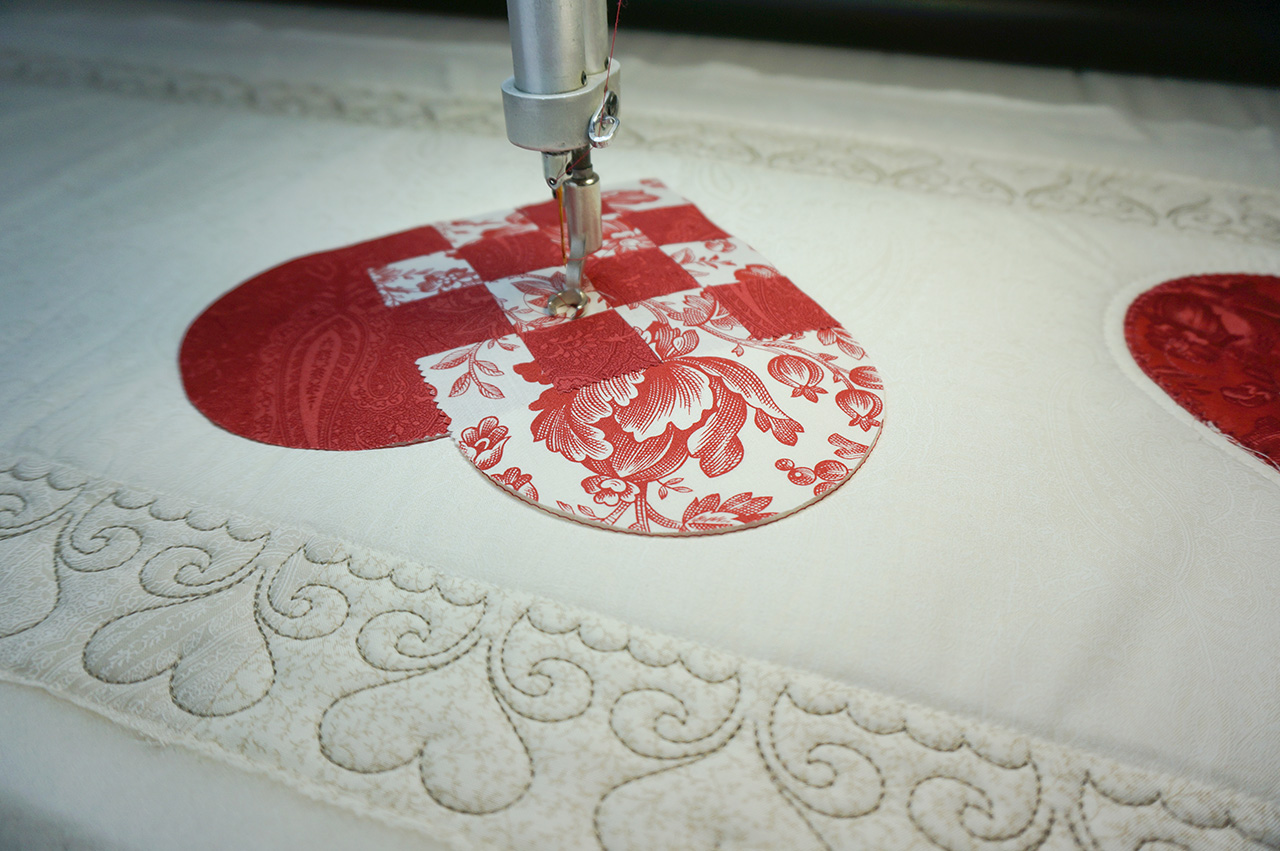
Change your thread color, we changed to INNOVATECH Thread in the color Beet.
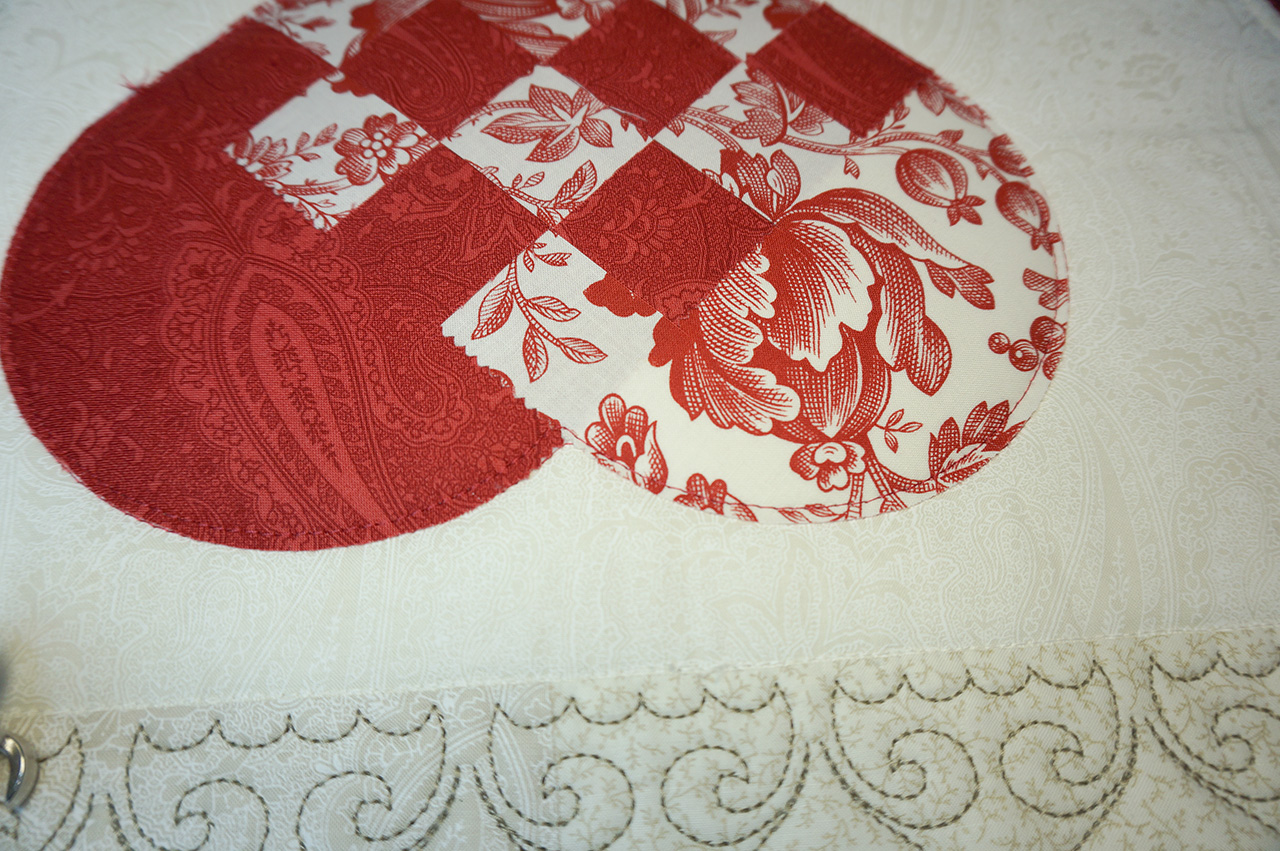
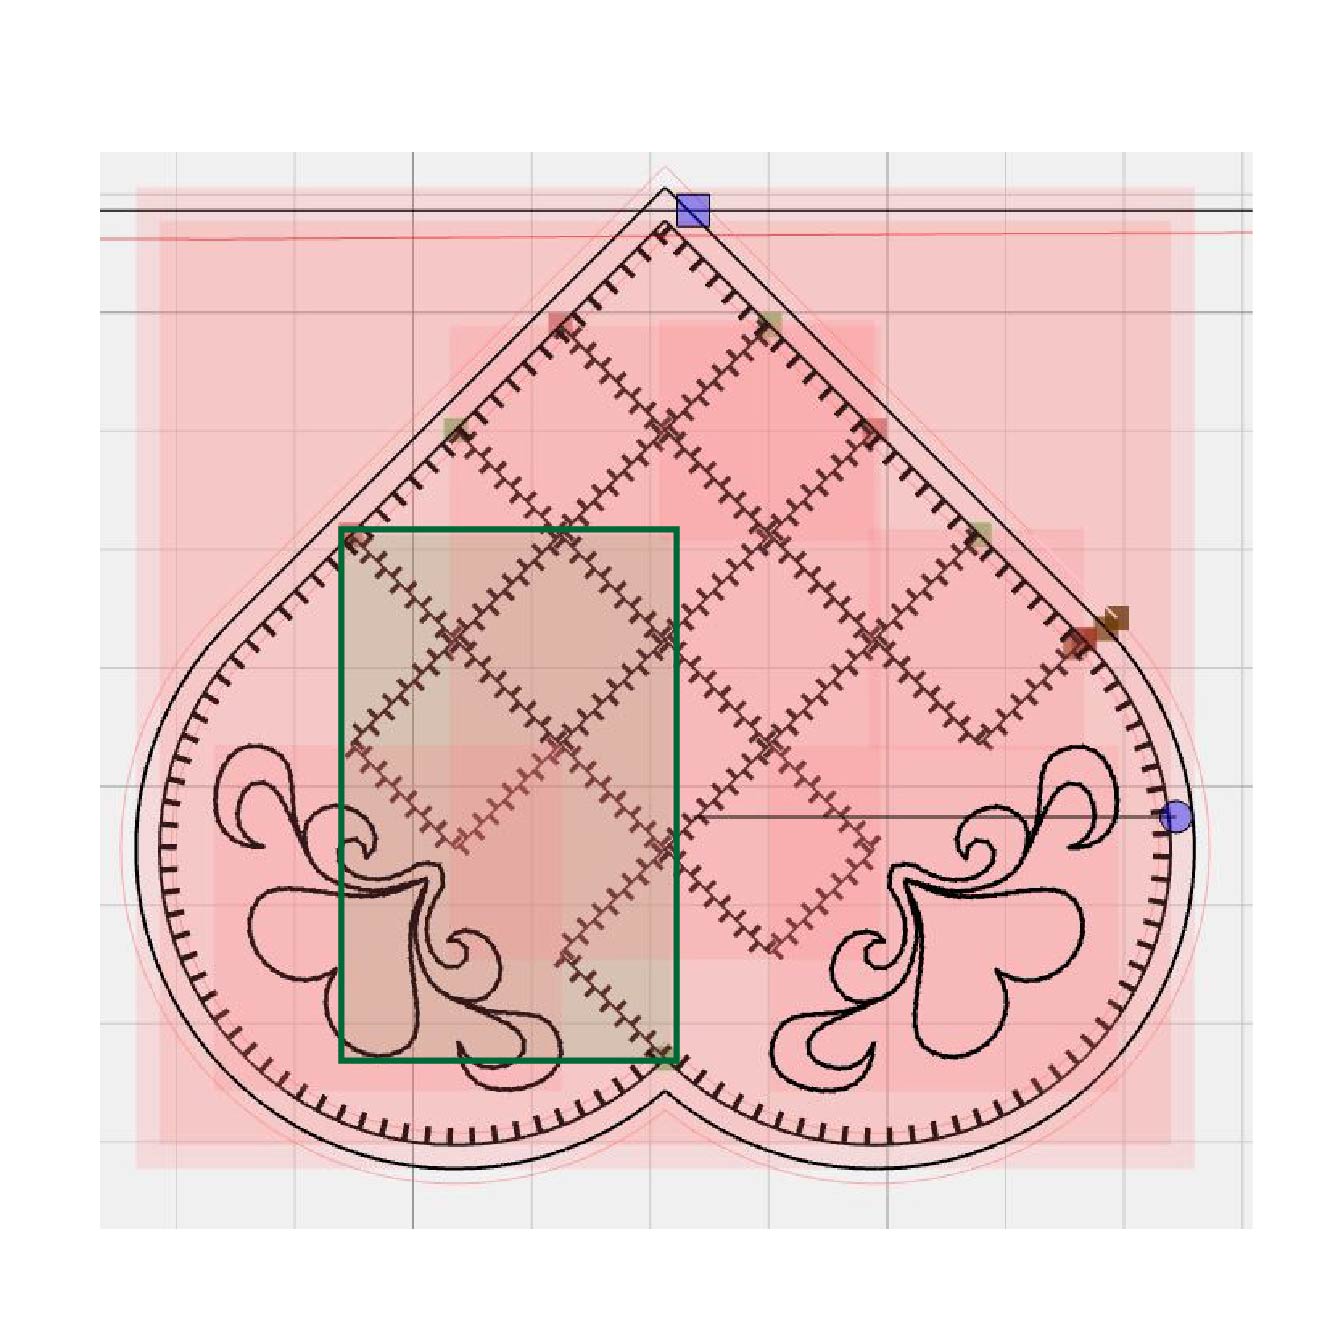
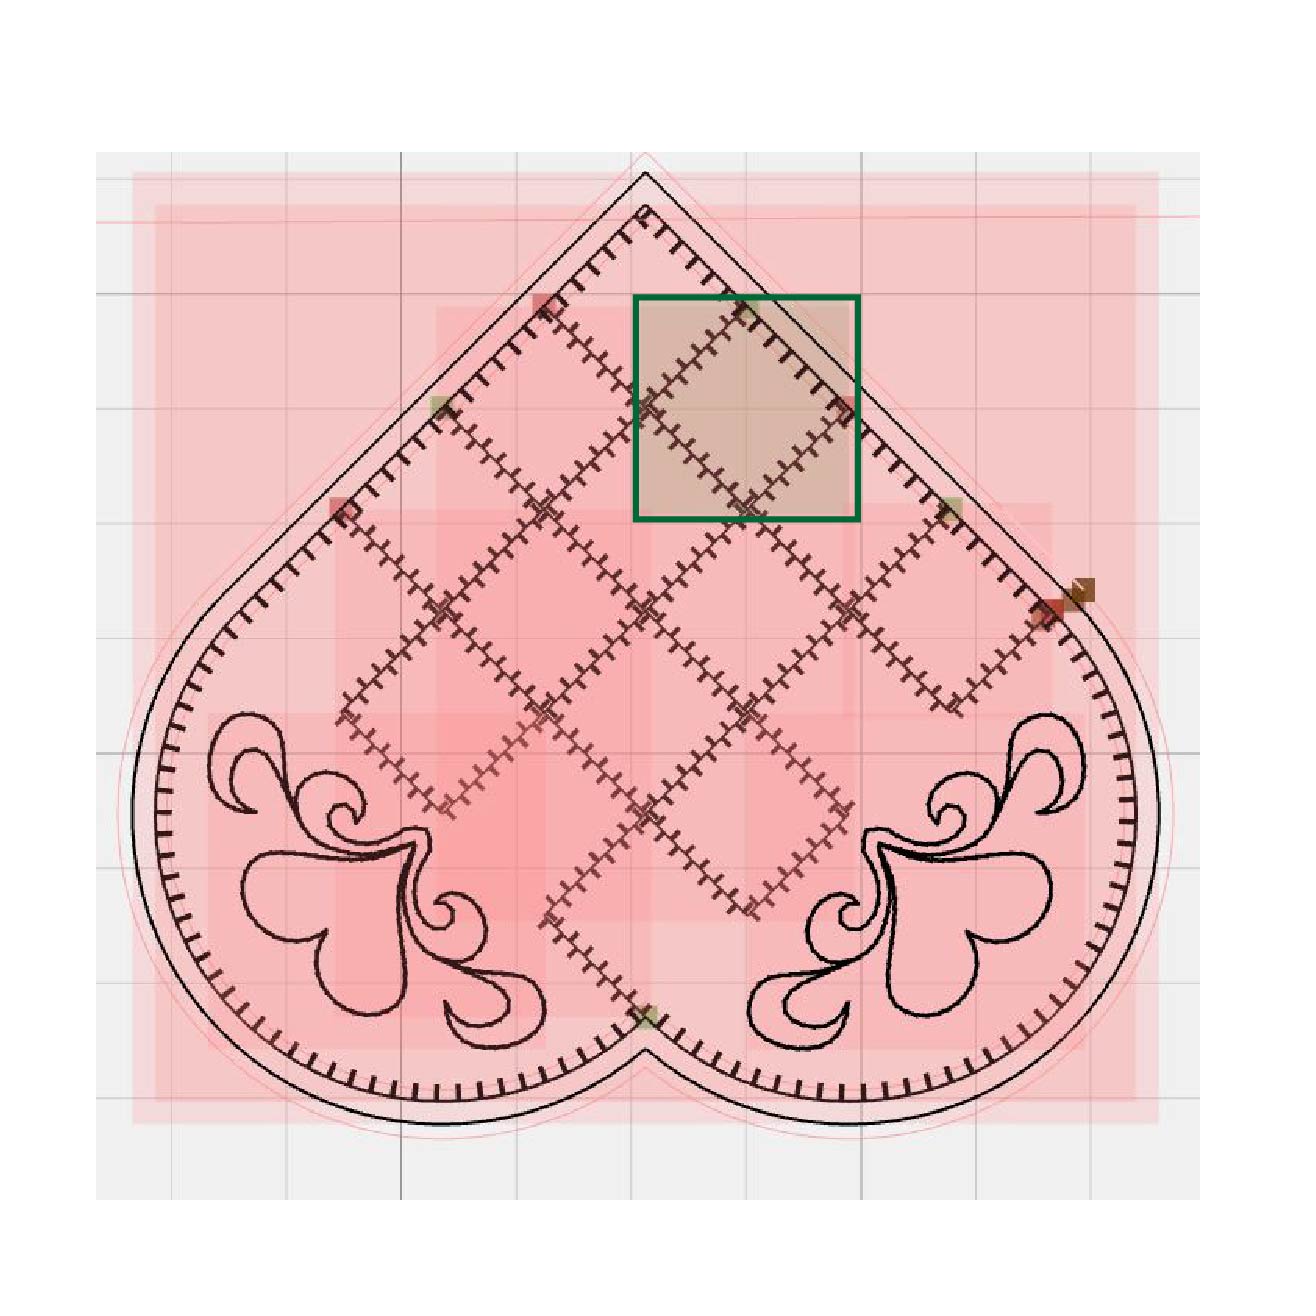
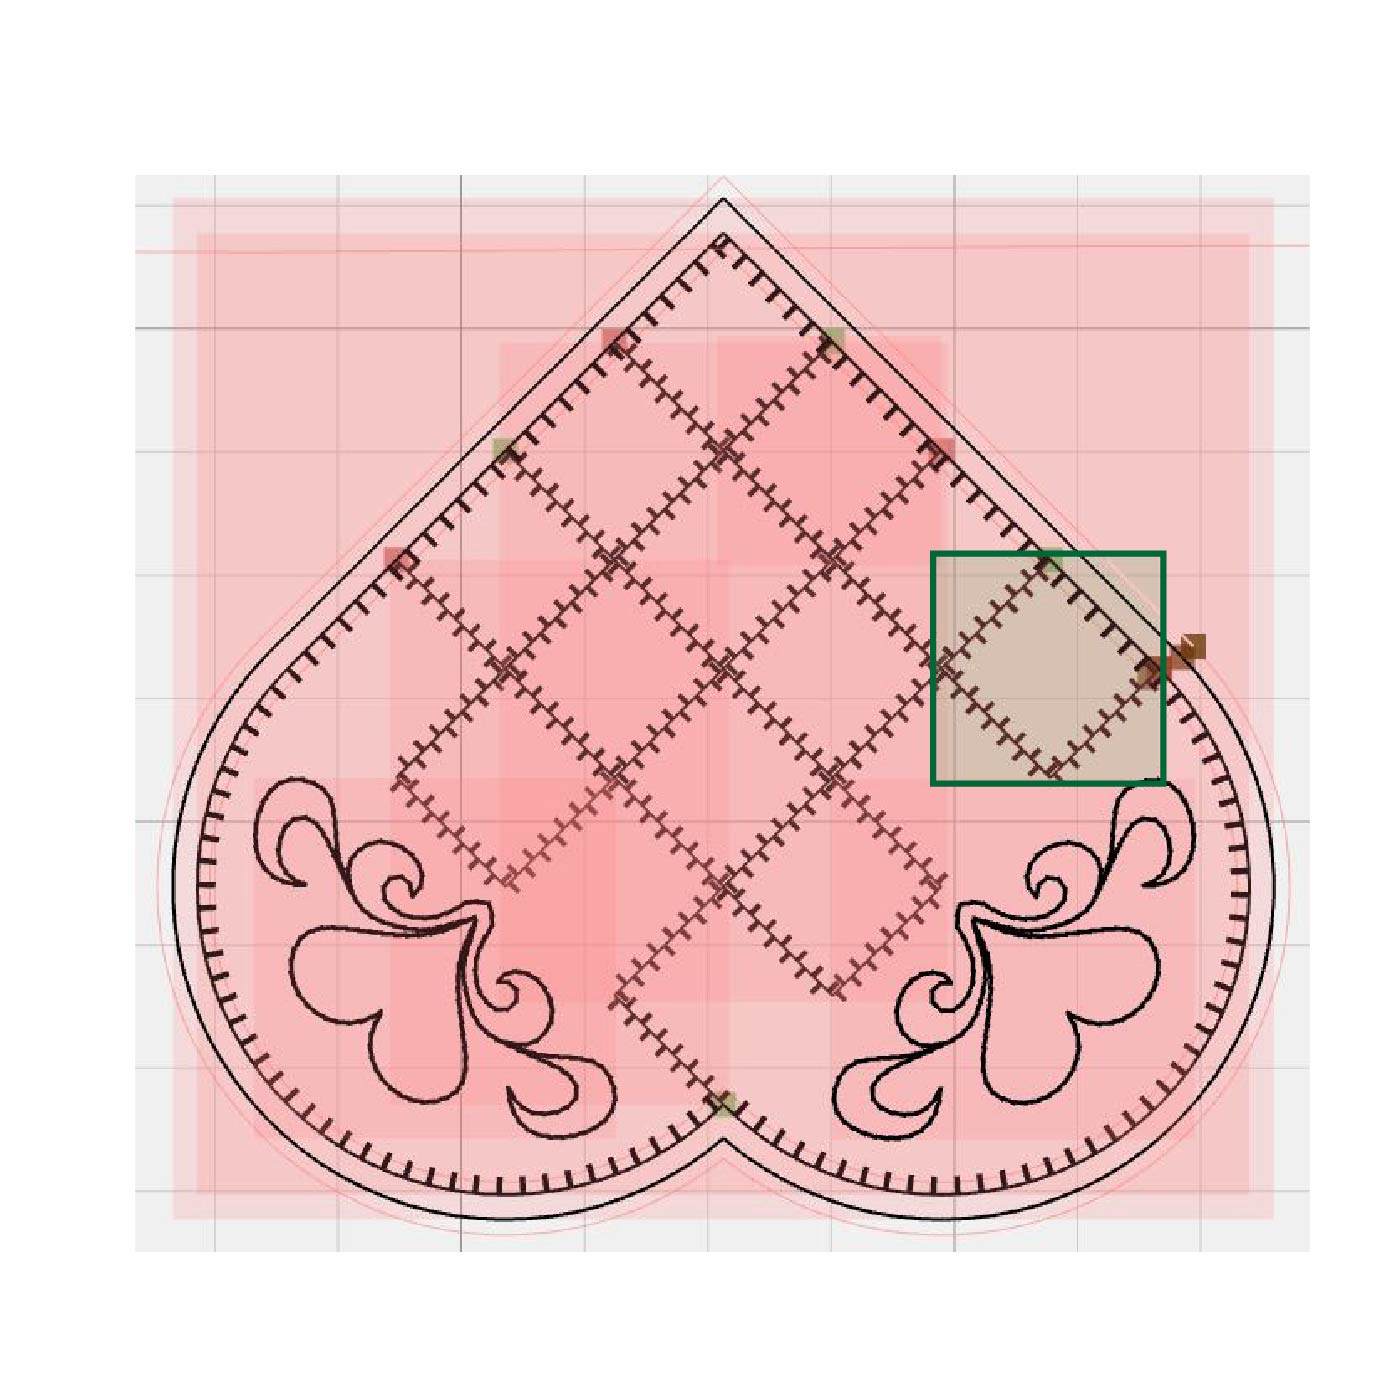
Place the Swedish Heart Embroidery set. You can find this embroidery set in the AutoPilot Mach 3 project file.
Nudge the pattern into place. Make sure to check the direction of the path stitching. The stitching should follow the raw edge of the woven heart. If it does not, select all layers and flip.
Once your pattern is lined up, select all the layers and dequeue.
Select the first checker Path Apply pattern, queue and stitch.
After stitching, dequeue the first set. Queue the second checker Path Apply and stitch.

Dequeue the second section after stitching.
Queue the third checker Path Apply section and stitch.
Dequeue the third section after stitching. Queue the last checker and stitch.
Dequeue the last checker after stitching. Now queue the Swedish heart blanket stitch outline and stitch.

Dequeue the Swedish heart blanket stitch. Queue the two Swedish Heart de lis and stitch.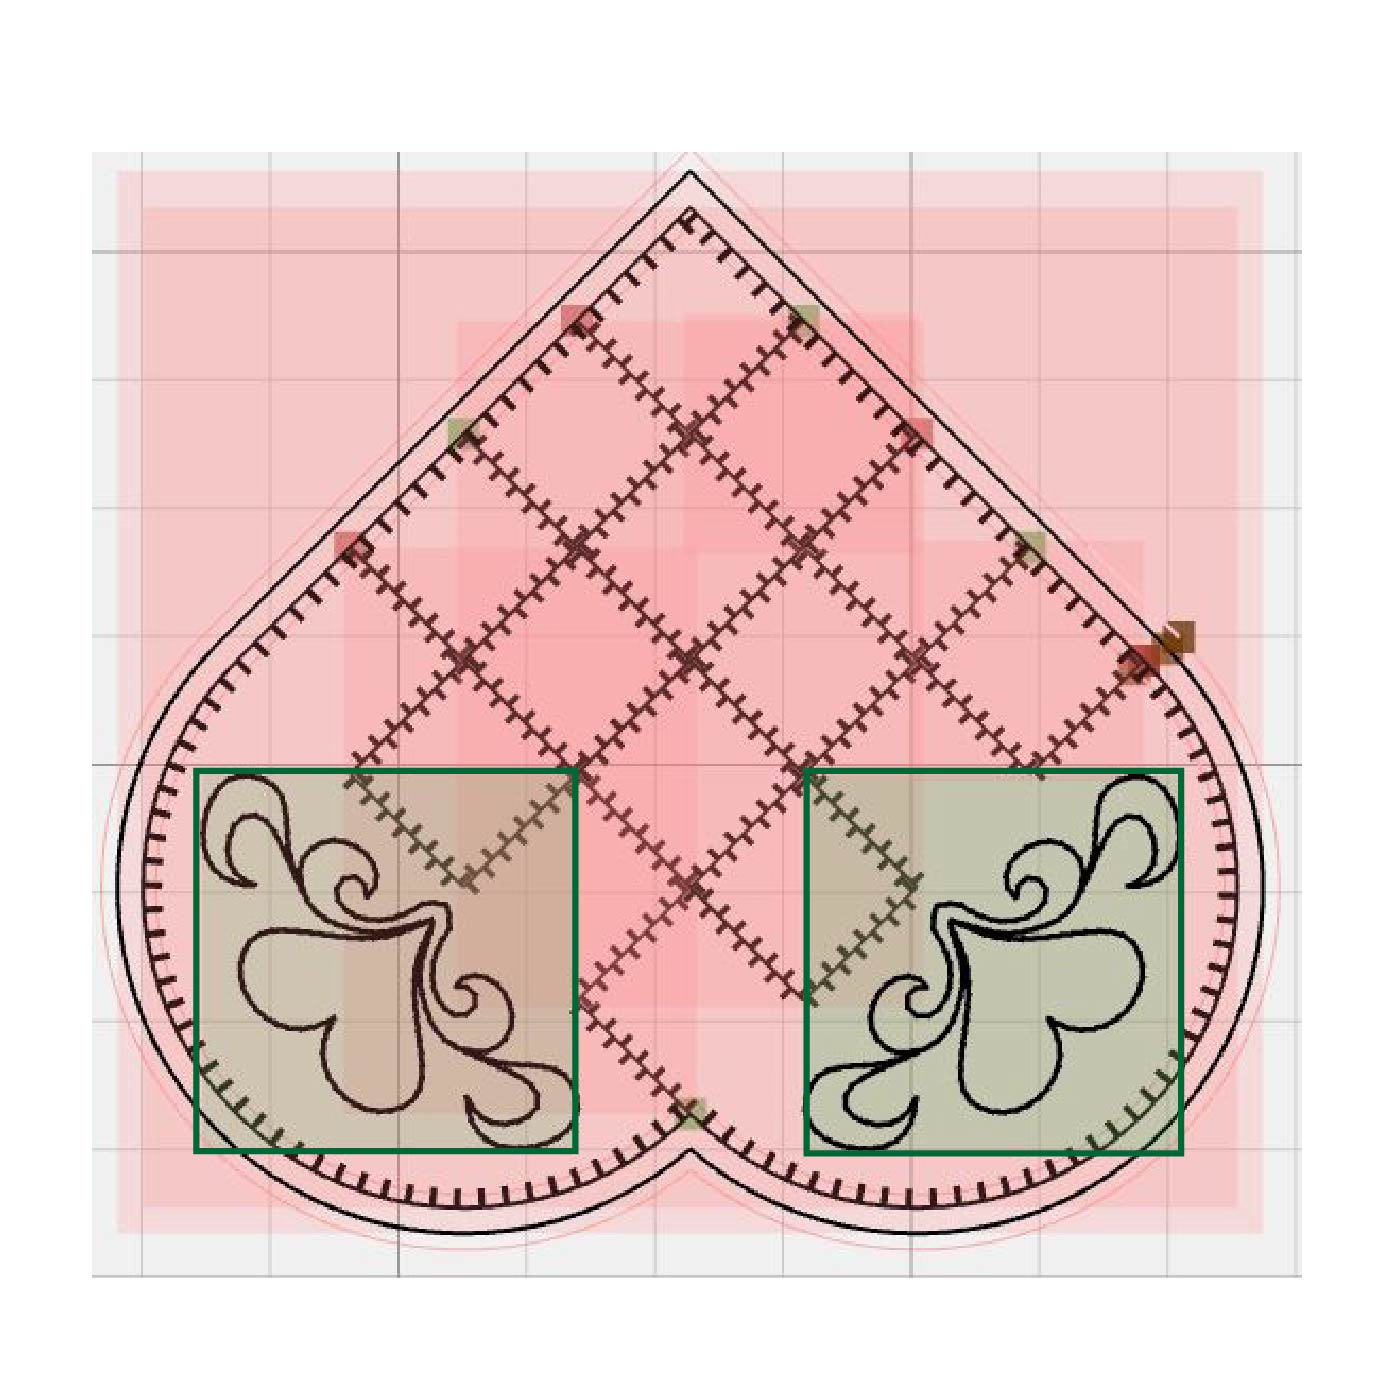
Dequeue the Swedish Heart de lis after it has been stitched.
For the next part we changed our thread color to INNOVATECH thread in Pearl.
After you change your thread color, queue the Sashiko Outline and stitch.
After the Sashiko outline has stitched, dequeue.
Repeat the steps above to complete the remaining hearts.
The next step is adding the background fill. For accuracy we stitched two hearts and then stitched the background fill behind them before moving on to more hearts.
Background fill

Place a background fill of your choice. Using the mask tool, mask the background inside the final heart outline.
We used INNOVATECH Thread in pearl to stitch the background fill.
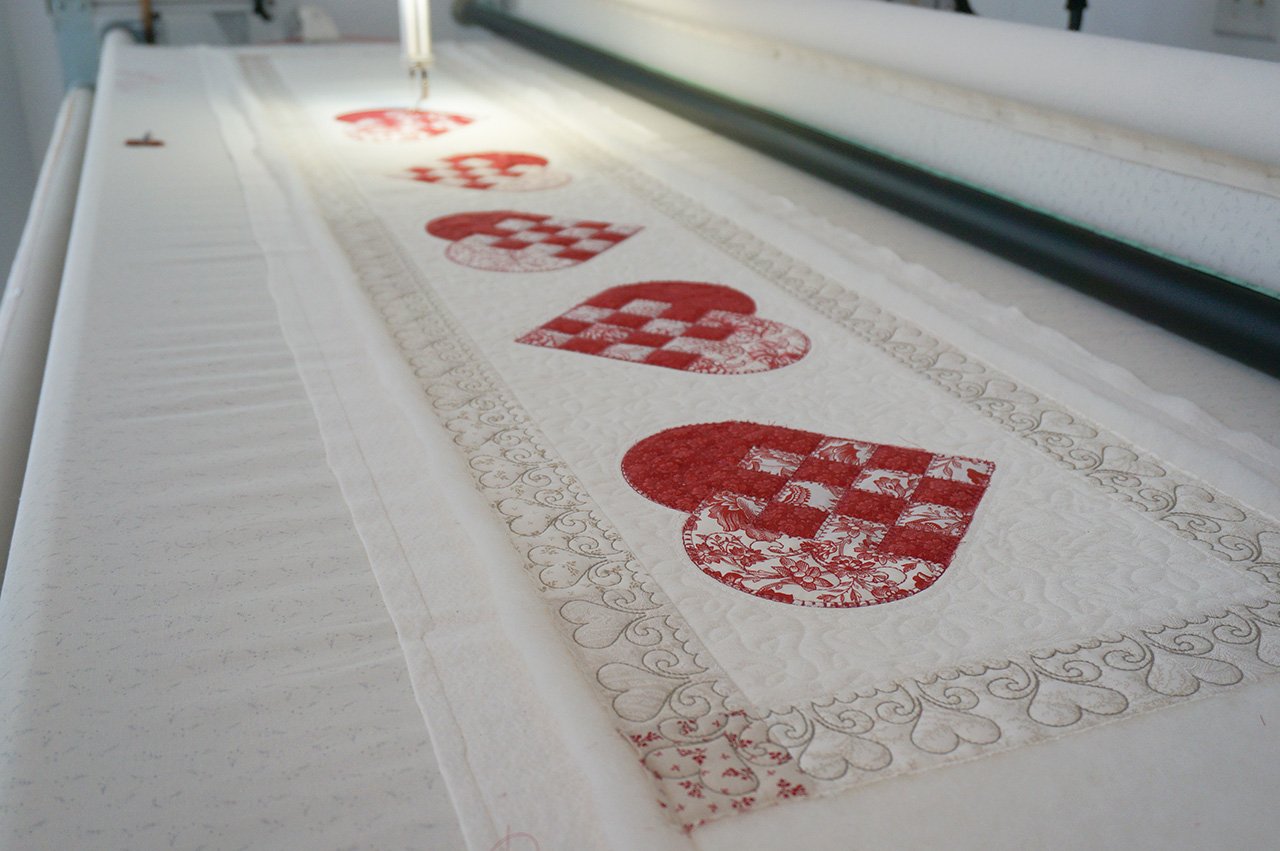
Border Stitching
Using the Pushpin tool, create a pattern line along the seam line of the border.
With the Path Apply, apply a motif of your choice to the Pushpin pattern line.

We used a motif that we created, feel free to try and create a new motif!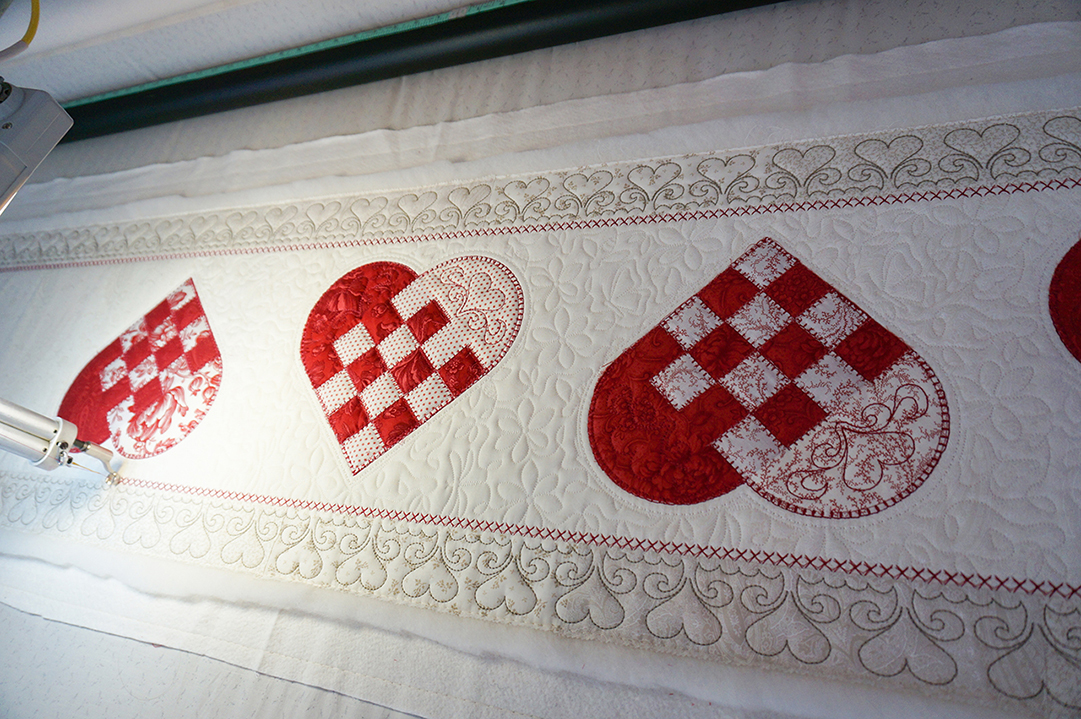
Finishing
Remove the runner from the frame and trim.
Use the dark yardage to bind the runner.
When you subscribe to the blog, we will send you an e-mail when there are new updates on the site so you wouldn't miss them.
Steps to get your Free 14 Day Trial for AutoPilot™ Simulator:
- Get your serial number by clicking here, fill out the form and hit the SUBMIT button.
*Your serial number will arrive in the email you provided. Check your junk folder if you do not see it right away. - Download the AutoPilot Mach 3 Simulator Free Trial Version here.
*You will need a minimum of Windows 8 pro 64bit. - Follow the prompts to install and activate the simulator with your provided serial number.
*If you get a message saying MSFT Defender is protecting your computer, click more and run anyway. - Enjoy your AutoPilot™ Mach 3 Simulator Free Trial Version for 14 days, then contact your local INNOVA dealer to order your new AutoPilot™ Mach 3 and enjoy those features for the lifetime of the product!
Disclaimer
License and Disclaimer of Warranty Information By downloading, wiring to or using the AutoPilot Simulator program and hardware, you acknowledge acceptance of the following DISCLAIMER OF WARRANTY: DISCLAIMER OF WARRANTY ALL THE COMPUTER PROGRAMS AND SOFTWARE ARE SOLD "AS IS" WITHOUT WARRANTY OF ANY KIND. WE MAKE NO WARRANTIES, EXPRESS OR IMPLIED, THAT THEY ARE FREE OF ERROR, OR ARE CONSISTENT WITH ANY PARTICULAR STANDARD OF MERCHANTABILITY, OR THAT THEY WILL MEET YOUR REQUIREMENTS FOR ANY PARTICULAR APPLICATION. THEY SHOULD NOT BE RELIED ON FOR SOLVING A PROBLEM WHOSE INCORRECT SOLUTION COULD RESULT IN INJURY TO A PERSON OR LOSS OF PROPERTY. IF YOU DO USE THEM IN SUCH A MANNER, IT IS AT YOUR OWN RISK. THE AUTHOR AND PUBLISHER DISCLAIM ALL LIABILITY FOR DIRECT, INDIRECT, OR CONSEQUENTIAL DAMAGES RESULTING FROM YOUR USE OF THE PROGRAMS OR FROM CONNECTING IT TO YOUR MACHINE.
The computer programs AutoPilot™ Simulator are Copyright © 2019 of Neal A. Schwarzberger and ABM International, Inc.. AutoPilot™ Simulator is a trademark of ABM International, Inc. AutoPilot™ Simulator is a proprietary product, its concept, design and functionality are Property of ABM International, Inc.